


Hey Everyone, welcome back to Stash Blasting Wednesday.
It has been a bit since the last log cabin block. In fact so long I can’t even remember which one it was, oh yah that’s right it was Log Cabin in the Round. How could I forget seeing how I used my favourite complementary colour scheme – turquoise and orange.
Today’s block is made with the last pair of colours on the colour wheel that make up a complementary colour scheme. The colours are yellow-oarnge and blue-violet. I ended up using only 2 fabrics for this block which suits it fine but I would have liked to have had 3 of the blue-violet from light to dark. Unfortunately, my stash was not cooperating with this request. I have lots of purple just not blue-purple.
I am calling this block a variation on the courthouse steps block because it has cornerstones in each corner of every round. The great part about this block is that it could be done totally scrappy with the cornerstones being one colour or vice versa.
The block is once again 12 inches finished.
Cutting Instructions
Amounts are for one block and all measurements include the ¼″ seam allowance.
Piece A – cut 12 – 2″ square from the yellow-orange fabric
Piece B – cut 1 – 3 ½″ square from the yellow-orange fabric
Piece C – cut 4 – 2″ x 3 ½″ rectangles from the blue-violet fabric
Piece D – cut 4 – 2″ x 6 ½″ rectangles from blue-violet fabric
Piece E – cut 4 – 2″ x 9 ½″ rectangles from the blue-violet fabric
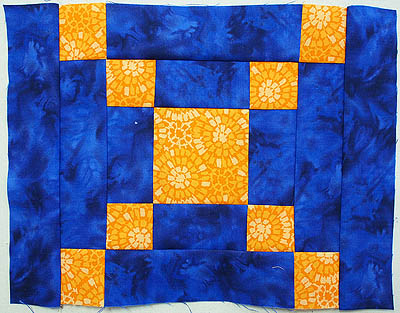
Here is a photo of where the pieces go.

Fabrics cut and ready to sew together
Block Layout
Here are the pieces shown with their corresponding letter.

Pieces with corresponding letter
Making the Block
All seams are a ¼″.
1. Sew piece A to each end of piece C, D & E. Make 2 of each. Press the seam towards the blue-violet rectangles.

Piece A sewn to rectangles
2. Sew piece C to either side of piece A. Press the seam towards piece C.

Piece C sewn to piece B
3. Sew the A-C units made in step 1 to the top and bottom of the unit made in step 2. Press the seam towards piece C.

A-C units added
4. Sew piece D to either side of the unit made in step 3. Press the seam towards piece D.

Piece D added to each side
5. Sew the A-D units made in step 1 to the top and bottom of the unit made in step 4. Press the seam towards piece D.

Add A-D unit to the top and bottom
6. Sew piece E to either side of the unit made in step 5. Press the seam towards piece E.
Piece E added
7. Sew A-E units made in step 1 to the top and bottom of the unit made in step 6. Press the seam towards piece E. The block is now complete and will measure 12 ½″.

Block complete
I made 4 blocks and here they are in a 4 patch configuration. The two fabrics work very well for this block. This layout will lend itself to custom quilting with the large open areas of blue-violet as well as a place to do some embroidery or appliqué.

The cornerstones make a wonderful chain design over the background
I now have 6 sets of log cabin blocks with 4 in each set for a total of 24 – 12 inch blocks. How am I going to put them together? It will be an interesting quilt using all of the colours on the colour wheel and 6 different log cabin blocks.
All and any ideas welcome.
Happy Quilting!


l like the idea of scrappy blocks with the cornerstones one colour. Used up all my brain power for now as am about to do my first scalloped border. When I did an Irish Chain quilt I put True Lovers’ Knots in the space, might translate quite well to FMQ as start and end in one place.
Yes, I think the scrappy version will look good as well and I certainly have enough scraps to make several hundred blocks I am sure.
This block reminds me of what I call the Alabama block.
http://www.blockcentral.com/qb-pattern-alabama.shtml
It is a variation of the Alabama block but I also thought it looked a lot like the Courthouse steps block.