
Amigurumi: All You Need to Know About Japanese Crochet
by Jessica Esa | CRAFT
Amigurumi, the craft of creating cute crocheted dolls, is absolutely everywhere at the moment. Blossoming in Japan, the kawaii designs have the world taking up crochet to recreate and design their own creatures and dolls. But where did this art originate? And how can you get started? We spoke to Erinna Lee, author of Amigurumi Treasures, about her inspirations and methods.
1. What is Amigurumi?
Amigurumi has a long and fascinating history and the tiny stuffed toys which are quick and satisfying to make have very much become a staple of Japanese kawaii culture. The word is a blend of the words ami (編) meaning crocheted or knitted, and nuigurumi (ぬいぐるみ) a small, stuffed doll. Although the exact origin of crochet dolls is difficult to place, historians agree that the art probably came from China with records of knitted dolls dating back to the Shang dynasty.
The Dutch are also thought to have introduced knitting techniques to Japan in the late nineteenth century which in turn became popular with samurai who would develop the technique to decorate and create garments. Amigurumi as we know it became popular in the 1980s with the kawaii movement and an NHK show named Ami. The craft, requiring very few materials and space to get started, became an instant hit. The craze in the west has been more recent, properly taking off in the early to mid-2000s aided by video tutorials on Youtube. While amigurumi can be knitted, it’s most commonly associated with crocheting.
Erinna Lee, author of Amigurumi Treasures
Erinna Lee, started crocheting in mid-2014 while looking for something to do outside of work. “It was mainly a way for my mind to take a break from the sometimes stressful demands of my job. Whilst I have always been pretty active physically, I wanted to tap into my creative side and learn a new craft”. Learning crochet has taken off massively across Japan and the Western world since it’s fairly easy to pick up; with a few simple stitches, you can make a surprising and versatile amount of projects.
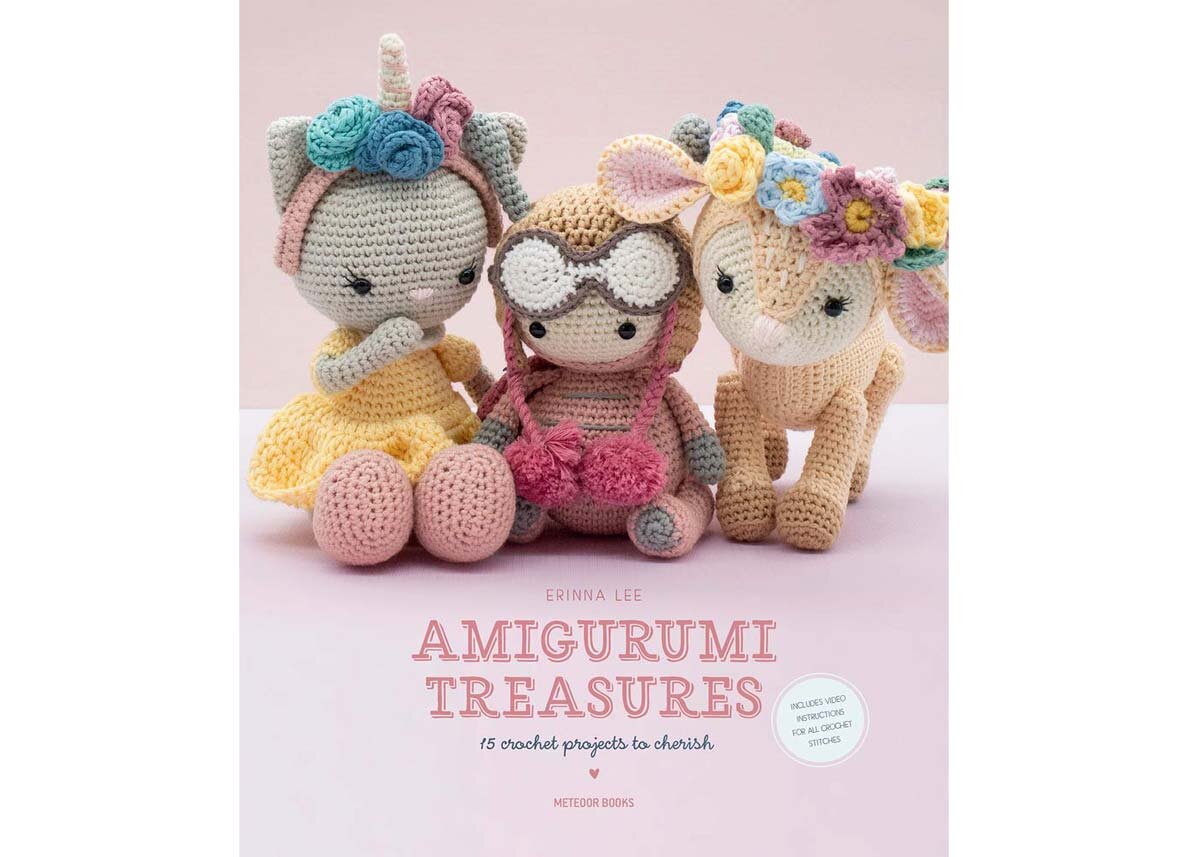
Amigurumi Treasures by Erinna Lee, available at Amazon
Amigurumi specifically is what has attracted many people, including Lee. “It was actually amigurumi that made me want to crochet. My love for amigurumi started on a golf course! A playing partner had an amigurumi giraffe golf club headcover and from there I slowly learned about the creative possibilities that amigurumi had to offer. Amigurumi seemed a perfect outlet to appease my love of the kawaii aesthetic and stuffed plushies!”
© Erinna Lee, Amigurumi
Lee published her collection Amigurumi Treasures in 2019 where she brings fifteen individual kawaii designs together which “vary widely in their approach to achieving a finished creation. In doing so I hoped to offer those who used my book different ideas and skills, something they could get a lot out of.” Lee has been inspired by many beautiful illustrators such as E.H. Shepard for the Winnie the Pooh stories, and Quentin Blake who collaborated with Roald Dahl.
Lee shares her expertise here with everything you need to get started with crochet and amigurumi.
2. Getting Started With Amigurumi - What You’ll Need
© Erinna Lee, Amigurumi Tools
Unlike many other crafts, you really don’t need much to get started with crochet and amigurumi. Although there are fun extras you can purchase, you really only need some crochet hooks and your chosen yarn which makes it a cheap and portable hobby to take up.
It’s also perfect if you have the imagination for designing fun characters but don’t rate your drawing skills. “I am a hopeless artist despite my love for cartoons, illustrations, and animation, therefore amigurumi seemed a great alternate way to create the characters I see in my head. Instead of putting pen to paper, using a crochet hook and yarn was much kinder to me. I always hope that my designs will make someone go aww. If I can achieve that then I know I’ve reached my design goal of capturing the emotions and character of the creation I see in my head.”
Crochet Hooks
To bring your amigurumi creations to life, you’ll need:
● A set of crochet hooks. An average set will usually range between 2mm to 6mm The larger the hook the bigger the holes in your work so for amigurumi you’ll be generally working with smaller hooks: 2-4.
● Your chosen yarn. Yarn comes in different thicknesses and usually falls into these groups : animal-fiber based yarn like wool, plant-based fiber like cotton and hemp, and synthetic fiber yarns like acrylic.
In Lee’s words: “Yarn preference can vary by person and type of projects but I am a huge fan of cotton yarn and almost exclusively use this fiber for my designs. I think that it provides a better structure for amigurumi. However, I also love the look that wool gives to a finished amigurumi. Some of my favorite cotton yarn brands that I have used in my designs include Krea Deluxe, DMC Natura Just Cotton and Yarn and Colors.
Yarn
“For a beginner, I would recommend a heavier weight yarn like 8-ply and a larger hook size such as a 3.5 mm or 4 mm hook. Which size hook to use with your yarn of choice depends a lot on your stitch tension when you’re holding your yarn too. I personally love using a 2.5 mm hook with 4-ply yarn. I think this combination works for my designs as I like to incorporate a lot of shaping and details and this allows me to achieve this effect.”
If you’re in Tokyo you might want to check out these 5 Top Picks for Where to Buy Fabrics in Tokyo.
As you move on some other essentials, in addition to hook and yarn, will become necessary. For example:
● Toy stuffing (polyester works best).
● Safety eyes though you can also use cotton thread to stitch on eyes and other details.
● Embroidery thread.
● Crochet needles for darning which have a much bigger eye to thread the yarn in easier
● Stitch markers which are a definite must - if you don’t want to buy them, you can use bobby pins, a light hooked earring or any other item that will stay put.
● Row counter - you can get digital row counters but you can also just use a pen and paper to note down where you are with regards to your pattern.
And, of course, you’ll need a pattern you love. Apart from sources like Amigurumi Treasures, you can purchase patterns online.
3. How to Make Your First Amigurumi Stiches
© Erinna Lee, Crochet Chain
On this, Lee had to say: “With the help of books, online videos, and blogs, I learned how to hold a crochet hook – though this did not come totally naturally. I remember my first task was to create a string of chain stitches and it was so difficult! However, things started to make more sense after a few goes once my ten fingers cooperated with each other and I was hooked (pardon the pun)! However, the learning never stops and until today I am still learning so much more to do with crochet.”
Here are the common techniques you’ll need to learn for creating amigurumi:
© Erinna Lee, Using a Crochet Hook
Holding the Hook: You can either hold your crochet hook with a knife or pencil grip. As you would expect, this means you’ll be holding it as if you would a knife or a pencil.
© Erinna Lee, Slipknot
Slipknot: This is how you create the first loop on your hook. There are several ways to do this so if you find one that’s difficult, try another method until you find one that works for you.
Making a Chain: Most crochet projects will begin with a length of chain which makes your foundation chain so take your time to master this. You’ll start with your hook facing up with your slip knot on top in your dominant hand. In your other hand, you will have the yarn pulled tautly. You’ll pass your hook in front of the yarn under and around it (a counter-clockwise motion), hook the yarn and pull it through your slip knot. This is your first chain and you repeat this method for as many as your pattern asks for. You can easily count how many chain stitches you’ve made by counting the ‘v shapes’ on your chain.
Tip: Make sure the stitches are even, not too loose or tight and this will give you trouble later. You can change the size of your hook to larger or smaller to help you out with this as first. This video will help you to learn all these techniques above.

Single Crochet: (Also known as Double Crochet on UK patterns): This stitch is perfect for amigurumi as it creates a dense fabric with no gaps and you’ll find that you’re using this stitch over and over again. The video above goes through this technique to get you going in no time.
© Erinna Lee, Magic Circle
Magic Circle: Most amigurumi patterns start with making a ‘magic circle’, this is simply creating an adjustable circle (usually the top of the head) where you’re able to pull in the hole in the middle compared to simply crocheting a circle which will leave a hole in the center which you can’t adjust. This technique can take some practice to master but once you’ve got it, you’ll be amazed by how useful it is. Here is the most common technique for making the circle but there are others.
Increasing and Decreasing: Most patterns will ask you to increase stitches and decrease stitches which will give your project its shape. To increase you’ll be working more stitches into a single stitch which will increase the number of stitches in a row. Then to decrease you’ll be working two stitches together before finishing the stitch to create fewer stitches in the row. Here’s a video to help with learning this.

Fasten off: When you’re finishing your work you’ll need to fasten off. Just pull up the final stitch to make it bigger and cut the yarn you’ve been using leaving enough of a tail to weave in. Pull the end through your loop and pull up to secure. You can then use your needle to work the leftover tail into the work for extra security or snip the excess. The video above illustrates some fastening off techniques.
These are the basics you’ll need to start making amigurumi! There’ll be other things you’ll need to learn like changing yarn colors and other stitches to learn if you want to make other kinds of projects but these basic steps can be learned very quickly so keep practicing and you’ll be making beautiful amigurumi toys in no time.
4. Tips for Making Amigurumi
© Erinna Lee, Amigurumi
“Amigurumi is a wonderful way for crafters to create things that have the potential to be loved by others. The availability of social media and online retail platforms also have a huge part to play in this rise in popularity of amigurumi. Not only can we share our work with fellow craft lovers from around the world but it also allows people like myself who never dreamt of owning a small business the opportunity to do so.
“If you struggle at the start, do not give up. I had so much trouble when I first started to crochet and I genuinely thought of giving up. It is amazing how fast you get used to the feel and motion and before you know it, it will be second nature to you – it’s a perfect way to spend an evening with Netflix!
© Erinna Lee, Amigurumi
“I would encourage people to use as many patterns as you can and from different designers. I think each designer offers something different, whether it be little tips and tricks for creating the perfect amigurumi finish, or varying ways to achieve a shape, these are all things that help you grow in experience and finesse your skills.
“I also think it is worth investing time to take great photographs of your work. You have put in so much effort to create your beautiful amigurumi, take the time to now capture that perfect shot to really showcase your work!”
There’s a huge community associated with amigurumi and this is absolutely part of the fun so reach out to your fellow crocheters and you’ll be surprised what you can learn from them.
5. What Else Can You Do With Amigurumi Techniques?
© Erinna Lee, Amigurumi
One of the best things about crochet is that once you master the steps above, you can make so many things before having to learn further stitches. Aside from amigurumi, some other things you can make with the same techniques and can be easier to make while you practice, include bookmarks, facemasks, baby blankets, coasters, and many others.
Many of these things can contribute to a more eco-friendly lifestyle as you create your own household and reusable items and gifts for others. If you’re looking to get even more eco-friendly, then make sure to look out for recycled yarn or you can even reclaim yarn yourself from old sweaters but unraveling it, wetting it and leaving it to dry. You can even experiment with dyeing that yarn to fit your personal projects perfectly! Click here to learn more about Mottainai: Japan’s Eco-Friendly Philosophy!
To get started on your Amigurumi journey, and for some of the adorable patterns you’ve seen in this article, check out Amigurumi Treasures, by Erinna Lee, available at Amazon!
JO SELECTS offers helpful suggestions, and genuine recommendations for high-quality, authentic Japanese art & design. We know how difficult it is to search for Japanese artists, artisans and designers on the vast internet, so we came up with this lifestyle guide to highlight the most inspiring Japanese artworks, designs and products for your everyday needs.
All product suggestions are independently selected and individually reviewed. We try our best to update information, but all prices and availability are subject to change. As an Amazon Associate, Japan Objects earns from qualifying purchases.
June 19, 2020 | Craft
RELATED JAPANESE CRAFT


MOST POPULAR
LIFESTYLE | July 28, 2023