
By Nick Simonson
Tying the crease fly – a foam and fur baitfish imitator – is one part tackle crafting and one part fourth grade art class, and as a whole, as enjoyable of an experience at the vise as it is on the water. The combination of a bucktail or synthetic hair finish with a foam body that flips and twitches with spastic motion and a cupped mouth that gurgles and pushes water creates a realistic dying baitfish vibe that drives all predators wild. In the process of putting the fly together, it’s easy to flex some creative muscle and customize each one to match naturally occurring prey, or make something that’s totally out there, even for those of us who got a C-minus in our elementary school art class.
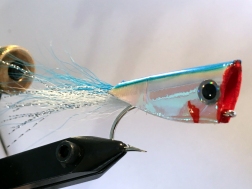
MATERIALS:
Hook: Long Shanked, Sz 4 to 2/0
Thread: White 3/0
Tail: Bucktail & Krystal Flash
Body: Adhesive Foam w/Mylar Sheet
Finish: Permanent Marker, Stick-On Eyes, Epoxy
CLICK HERE FOR STEP-BY-STEP TUTORIAL
Start the crease fly by securing a long-shanked hook (here a Mustad 3407) in the vise and form a thread bed. For the step-by-step pattern, it’s a yellow perch, so the colors will match that natural forage, but this fly is easily customized to match any baitfish that swims. Tie in a pinch of white bucktail for the bottom of the fly’s tail, starting from the front of the hook shank to the bend. Make sure to hold up on the bucktail as it is being tied down, to keep it on top of the hook shank and provide a base for the foam body. Upon reaching the bend, throw four or five thread wraps under the bucktail to help it angle up. Advance the thread to the front of the hook and repeat the process with a pinch of orange krystal flash, adding a few more wraps under the base of the tail at the end of the tie-down point (1).
Take a small pinch of chartreuse bucktail at the front of the hook and secure it in the same fashion over the flash, with a few more wraps under the tail to help it angle up; repeat the process with the last pinch of green bucktail to finish the tail of the fly. Advance the thread to just behind the hook eye, whip finish and cement the hair and thread for posterity (2).
Create the body by taking a sheet of adhesive-backed foam and place the adhesive side down on a mylar sheet. It’s easier to do smaller strips of foam, so there aren’t as many wrinkles and bubbles in the mylar, but a few don’t hurt and add some texture to the skin of the pattern (3). Utilize a variety of templates for body styles and cut out the foam body for the fly (4). An elongated body will hold the tail down, a body with a clipped end will let it pop up and out of the fly for more action. Cut around the template to form the body to be used (5).
Fold the foam over and measure the body on the fly, so that the front of the foam will stop just behind the hook eye; trim off the excess and then lock the foam in place with a couple drops of quick-setting Zap-a-Gap, pinching only just below the hook shank to bring the foam together (6). Once secure, get artistic. Color in the foam with permanent markers, adding patterning, gills and the fly’s hallmark red mouth, along with a stick-on eye on both sides. Let the ink set and dry and then apply epoxy to seal everything up to withstand the elements; once dry, the fly is done (7).
The option exists to also add a rattle by sliding it into the body of the fly and epoxying it in place, and the mouth can be closed with a piece of scrap foam before sealing it with epoxy for more of a popper or slider-style fly. Fish the crease fly on floating line, strip and rip it on the surface for a wicked BLOOP! that matches any bass popper. These flies shine when smallies rush the shallows in spring and multiple males are competing for an area, or in mid-summer when white bass are schooling. They’re as fun to fish as they are to make, and that should give the crease fly space in any fly box!
