EP0647122B1 - Reusable endoscopic surgical instrument - Google Patents
Reusable endoscopic surgical instrument Download PDFInfo
- Publication number
- EP0647122B1 EP0647122B1 EP93916724A EP93916724A EP0647122B1 EP 0647122 B1 EP0647122 B1 EP 0647122B1 EP 93916724 A EP93916724 A EP 93916724A EP 93916724 A EP93916724 A EP 93916724A EP 0647122 B1 EP0647122 B1 EP 0647122B1
- Authority
- EP
- European Patent Office
- Prior art keywords
- tool assembly
- sleeve
- jaws
- extension
- port
- Prior art date
- Legal status (The legal status is an assumption and is not a legal conclusion. Google has not performed a legal analysis and makes no representation as to the accuracy of the status listed.)
- Expired - Lifetime
Links
- 210000003811 finger Anatomy 0.000 claims abstract description 127
- 210000003813 thumb Anatomy 0.000 claims abstract description 116
- 238000004140 cleaning Methods 0.000 claims abstract description 51
- 230000000717 retained effect Effects 0.000 claims abstract description 18
- 238000003780 insertion Methods 0.000 claims description 40
- 230000037431 insertion Effects 0.000 claims description 40
- 238000013519 translation Methods 0.000 claims description 22
- 239000012530 fluid Substances 0.000 claims description 17
- 239000013013 elastic material Substances 0.000 claims description 5
- 230000000712 assembly Effects 0.000 abstract description 7
- 238000000429 assembly Methods 0.000 abstract description 7
- 238000000034 method Methods 0.000 description 45
- 230000008569 process Effects 0.000 description 38
- 230000014759 maintenance of location Effects 0.000 description 10
- 238000009434 installation Methods 0.000 description 6
- 230000000994 depressogenic effect Effects 0.000 description 5
- 230000008859 change Effects 0.000 description 4
- 238000005520 cutting process Methods 0.000 description 4
- 230000007246 mechanism Effects 0.000 description 4
- 238000001356 surgical procedure Methods 0.000 description 4
- 230000008901 benefit Effects 0.000 description 3
- 210000001124 body fluid Anatomy 0.000 description 3
- 239000010839 body fluid Substances 0.000 description 3
- 239000007789 gas Substances 0.000 description 3
- 230000002452 interceptive effect Effects 0.000 description 3
- 239000000463 material Substances 0.000 description 3
- 230000013011 mating Effects 0.000 description 3
- 239000011800 void material Substances 0.000 description 3
- CURLTUGMZLYLDI-UHFFFAOYSA-N Carbon dioxide Chemical compound O=C=O CURLTUGMZLYLDI-UHFFFAOYSA-N 0.000 description 2
- 230000009471 action Effects 0.000 description 2
- 238000013459 approach Methods 0.000 description 2
- 230000008878 coupling Effects 0.000 description 2
- 238000010168 coupling process Methods 0.000 description 2
- 238000005859 coupling reaction Methods 0.000 description 2
- 230000000694 effects Effects 0.000 description 2
- 238000002674 endoscopic surgery Methods 0.000 description 2
- 230000006870 function Effects 0.000 description 2
- 230000003993 interaction Effects 0.000 description 2
- 238000012163 sequencing technique Methods 0.000 description 2
- 230000007480 spreading Effects 0.000 description 2
- 238000003892 spreading Methods 0.000 description 2
- 229910000639 Spring steel Inorganic materials 0.000 description 1
- 229910002092 carbon dioxide Inorganic materials 0.000 description 1
- 239000001569 carbon dioxide Substances 0.000 description 1
- 230000006835 compression Effects 0.000 description 1
- 238000007906 compression Methods 0.000 description 1
- 230000000881 depressing effect Effects 0.000 description 1
- 238000003754 machining Methods 0.000 description 1
- 238000012423 maintenance Methods 0.000 description 1
- 238000003825 pressing Methods 0.000 description 1
- 238000007789 sealing Methods 0.000 description 1
- 229910001285 shape-memory alloy Inorganic materials 0.000 description 1
Images


Classifications
-
- A—HUMAN NECESSITIES
- A61—MEDICAL OR VETERINARY SCIENCE; HYGIENE
- A61B—DIAGNOSIS; SURGERY; IDENTIFICATION
- A61B17/00—Surgical instruments, devices or methods, e.g. tourniquets
- A61B17/28—Surgical forceps
- A61B17/29—Forceps for use in minimally invasive surgery
-
- A—HUMAN NECESSITIES
- A61—MEDICAL OR VETERINARY SCIENCE; HYGIENE
- A61B—DIAGNOSIS; SURGERY; IDENTIFICATION
- A61B90/00—Instruments, implements or accessories specially adapted for surgery or diagnosis and not covered by any of the groups A61B1/00 - A61B50/00, e.g. for luxation treatment or for protecting wound edges
- A61B90/70—Cleaning devices specially adapted for surgical instruments
-
- A—HUMAN NECESSITIES
- A61—MEDICAL OR VETERINARY SCIENCE; HYGIENE
- A61B—DIAGNOSIS; SURGERY; IDENTIFICATION
- A61B17/00—Surgical instruments, devices or methods, e.g. tourniquets
- A61B17/28—Surgical forceps
- A61B17/29—Forceps for use in minimally invasive surgery
- A61B17/2909—Handles
-
- A—HUMAN NECESSITIES
- A61—MEDICAL OR VETERINARY SCIENCE; HYGIENE
- A61B—DIAGNOSIS; SURGERY; IDENTIFICATION
- A61B17/00—Surgical instruments, devices or methods, e.g. tourniquets
- A61B17/32—Surgical cutting instruments
- A61B17/320016—Endoscopic cutting instruments, e.g. arthroscopes, resectoscopes
-
- A—HUMAN NECESSITIES
- A61—MEDICAL OR VETERINARY SCIENCE; HYGIENE
- A61B—DIAGNOSIS; SURGERY; IDENTIFICATION
- A61B18/00—Surgical instruments, devices or methods for transferring non-mechanical forms of energy to or from the body
- A61B18/04—Surgical instruments, devices or methods for transferring non-mechanical forms of energy to or from the body by heating
- A61B18/12—Surgical instruments, devices or methods for transferring non-mechanical forms of energy to or from the body by heating by passing a current through the tissue to be heated, e.g. high-frequency current
- A61B18/14—Probes or electrodes therefor
-
- A—HUMAN NECESSITIES
- A61—MEDICAL OR VETERINARY SCIENCE; HYGIENE
- A61B—DIAGNOSIS; SURGERY; IDENTIFICATION
- A61B17/00—Surgical instruments, devices or methods, e.g. tourniquets
- A61B17/00234—Surgical instruments, devices or methods, e.g. tourniquets for minimally invasive surgery
- A61B2017/00362—Packages or dispensers for MIS instruments
-
- A—HUMAN NECESSITIES
- A61—MEDICAL OR VETERINARY SCIENCE; HYGIENE
- A61B—DIAGNOSIS; SURGERY; IDENTIFICATION
- A61B17/00—Surgical instruments, devices or methods, e.g. tourniquets
- A61B2017/0046—Surgical instruments, devices or methods, e.g. tourniquets with a releasable handle; with handle and operating part separable
-
- A—HUMAN NECESSITIES
- A61—MEDICAL OR VETERINARY SCIENCE; HYGIENE
- A61B—DIAGNOSIS; SURGERY; IDENTIFICATION
- A61B17/00—Surgical instruments, devices or methods, e.g. tourniquets
- A61B2017/00831—Material properties
- A61B2017/0084—Material properties low friction
-
- A—HUMAN NECESSITIES
- A61—MEDICAL OR VETERINARY SCIENCE; HYGIENE
- A61B—DIAGNOSIS; SURGERY; IDENTIFICATION
- A61B17/00—Surgical instruments, devices or methods, e.g. tourniquets
- A61B17/28—Surgical forceps
- A61B17/29—Forceps for use in minimally invasive surgery
- A61B17/2909—Handles
- A61B2017/2912—Handles transmission of forces to actuating rod or piston
- A61B2017/2919—Handles transmission of forces to actuating rod or piston details of linkages or pivot points
- A61B2017/292—Handles transmission of forces to actuating rod or piston details of linkages or pivot points connection of actuating rod to handle, e.g. ball end in recess
-
- A—HUMAN NECESSITIES
- A61—MEDICAL OR VETERINARY SCIENCE; HYGIENE
- A61B—DIAGNOSIS; SURGERY; IDENTIFICATION
- A61B17/00—Surgical instruments, devices or methods, e.g. tourniquets
- A61B17/28—Surgical forceps
- A61B17/29—Forceps for use in minimally invasive surgery
- A61B2017/2926—Details of heads or jaws
- A61B2017/2927—Details of heads or jaws the angular position of the head being adjustable with respect to the shaft
- A61B2017/2929—Details of heads or jaws the angular position of the head being adjustable with respect to the shaft with a head rotatable about the longitudinal axis of the shaft
-
- A—HUMAN NECESSITIES
- A61—MEDICAL OR VETERINARY SCIENCE; HYGIENE
- A61B—DIAGNOSIS; SURGERY; IDENTIFICATION
- A61B17/00—Surgical instruments, devices or methods, e.g. tourniquets
- A61B17/28—Surgical forceps
- A61B17/29—Forceps for use in minimally invasive surgery
- A61B2017/2926—Details of heads or jaws
- A61B2017/2931—Details of heads or jaws with releasable head
-
- A—HUMAN NECESSITIES
- A61—MEDICAL OR VETERINARY SCIENCE; HYGIENE
- A61B—DIAGNOSIS; SURGERY; IDENTIFICATION
- A61B17/00—Surgical instruments, devices or methods, e.g. tourniquets
- A61B17/28—Surgical forceps
- A61B17/29—Forceps for use in minimally invasive surgery
- A61B2017/2926—Details of heads or jaws
- A61B2017/2932—Transmission of forces to jaw members
- A61B2017/2933—Transmission of forces to jaw members camming or guiding means
- A61B2017/2936—Pins in guiding slots
-
- A—HUMAN NECESSITIES
- A61—MEDICAL OR VETERINARY SCIENCE; HYGIENE
- A61B—DIAGNOSIS; SURGERY; IDENTIFICATION
- A61B17/00—Surgical instruments, devices or methods, e.g. tourniquets
- A61B17/28—Surgical forceps
- A61B17/29—Forceps for use in minimally invasive surgery
- A61B2017/2926—Details of heads or jaws
- A61B2017/2932—Transmission of forces to jaw members
- A61B2017/2939—Details of linkages or pivot points
- A61B2017/294—Connection of actuating rod to jaw, e.g. releasable
-
- A—HUMAN NECESSITIES
- A61—MEDICAL OR VETERINARY SCIENCE; HYGIENE
- A61M—DEVICES FOR INTRODUCING MEDIA INTO, OR ONTO, THE BODY; DEVICES FOR TRANSDUCING BODY MEDIA OR FOR TAKING MEDIA FROM THE BODY; DEVICES FOR PRODUCING OR ENDING SLEEP OR STUPOR
- A61M39/00—Tubes, tube connectors, tube couplings, valves, access sites or the like, specially adapted for medical use
- A61M39/02—Access sites
- A61M39/06—Haemostasis valves, i.e. gaskets sealing around a needle, catheter or the like, closing on removal thereof
Definitions
- Endoscope is the generic term for a viewing tube which can be inserted into the body.
- the surgeon makes a hole or portal in the patient's body with a sharp punch-like device called a trocar which is inserted through a sleeve or cannula.
- the trocar is then removed, leaving the cannula in the portal.
- the surgeon then inserts desired instruments into the body via the cannula.
- portals are used to accommodate the instruments needed. These generally include a light source, a TV camera, and surgical tools such as scissors, graspers, dissectors and the like.
- US-A-4522206 discloses a cutting-suctioning instrument according to the preambles of Claims 1, 20, having an elongated support and first and second, opposed distal jaws, at least one of which is pivotable about a transverse axis and adapted to be closed by an actuator, and a suction throat defined between proximal portions of the two jaws.
- a sliding inner tube which defines the suction passage, serves as a actuator to move the pivotable jaw.
- WO-A-9102493 discloses a device for grasping or cutting an object, according to the preamble of Claim 15, which has at least two elongate elements, preferably two elongate elements, at least a portion of at least one of the elements if formed from a pseudoelastic material, preferably a shape memory alloy. End portions of the elements can be moved away from one another and then toward one another to grasp or cut an object between the elements.
- the device may further comprise an actuating means and at least a portion of the elements and/or the actuating means is formed from a pseudoelastic material.
- the present invention provides a surgical instrument comprising a tool assembly comprising jaws pivotable relative to each other, a sleeve, an extension within the sleeve, the extension and the sleeve being coupled to the jaws and being longitudinally translatable relative to each other to pivot the jaws toward open and closed positions and a handle assembly comprising a base having a port in which the tool assembly is retainable and an actuation trigger member pivotably mounted to the base comprising
- the present invention further provides a surgical tool assembly for attachment to a handle assembly comprising a sleeve, an extension within the sleeve and longitudinally translatable relative to the sleeve and jaws pivotable relative to each other, the jaws being pivotably mounted by a pivot to a distal end of the sleeve, each jaw having a slot at a proximal end of the jaw, sides of each slot being defined by inner walls of the slot, engagement of the extension with the inner walls of the slots as the extension is translated relative to the sleeve serving to open and close the jaws, characterized in that the slots are open-ended, the extension of being translatable in and out of the open-ended slots to permit engagement and disengagement of the extension.
- the tool assembly comprises a sleeve to which the tool jaws are pivotably mounted.
- the tool jaws may, for example, be scissor tool jaws or other type of jaw assembly.
- Each tool jaw has an open-ended slot at its proximal end.
- An extension is located within the sleeve and is translatable longitudinally within the sleeve. The extension is translatable in and out of engagement with the slots in the proximal ends of the tool jaws.
- the extension is coupled to the tool jaws, longitudinal translation of the extension back and forth causes the jaws to move between open and closed positions.
- the tool assembly is retained within the handle assembly.
- the handle assembly actuates the surgical jaw assembly by longitudinally translating the extension back and forth within the sleeve to cause the jaws to open and close.
- the jaws are mounted to the distal end of the sleeve via a pivot pin.
- the pivot pin passes through pivot holes in the jaws and into opposite sides of the sleeve.
- a drive pin is attached to the distal end of the extension. The drive pin engages the jaws such that longitudinal translation of the extension, when in engagement with the jaws, causes the jaws to open and close.
- the tool assembly consisting of the sleeve, the tool jaws, and the extension are detachable as a unit from the handle.
- the entire tool assembly is replaceable.
- the jaw assembly may be permanently attached to the sleeve. Alternatively, it may be removably attached to the sleeve. To accomplish this, the distal end of the sleeve may be made of an elastic material such that it can spread open to allow the jaw assembly to be inserted or detached with an insertion and detachment device.
- the jaw assembly can also be made with a spring-loaded compressible pivot which mounts the jaws to the distal end of the sleeve. The pivot is compressed to allow insertion and detachment of the jaw assembly. In these configurations, the jaw assembly is individually replaceable.
- the tool assembly comprises tool jaws pivotably mounted by a pivot to the distal end of the extension.
- the sleeve is positioned about the extension and is translatable relative to the extension to drive the tool jaws between open and closed positions.
- the proximal end of the tool assembly is inserted into a port in a first base portion of the handle assembly which has means for retaining the extension against longitudinal movement while permitting rotational movement.
- the handle also comprises a second trigger portion which is pivotable relative to the base portion to translate the sleeve relative to the extension.
- each of the tool jaws may comprise a slot at its proximal end and a jaw blade at its distal end.
- a pivot pin pivotably connects the jaws to the extension.
- a drive pin attached to the sleeve is positioned through the slots. At least one of the slots is angled or curved such that longitudinal translation of the sleeve and drive pin relative to the pivot pin causes the jaws to pivot between the open and closed positions.
- the drive pin is longitudinally positioned between the pivot pin and the proximal end of the tool assembly.
- the invention can also provide for cleaning of the tool assembly between uses.
- the tool assembly includes a cleaning port.
- cleaning fluid may be introduced from a syringe into the tool assembly via a cleaning port in the tool assembly.
- the cleaning fluid enters the sleeve to clean the interior of the sleeve as well as the extension and jaw assembly if attached.
- a spring loaded ball valve is used to open and close the cleaning port.
- a syringe containing cleaning fluid forces the ball valve to open the cleaning port as the fluid is introduced.
- the ball valve closes the cleaning port to prevent fluids and gases from the surgical site from migrating out of the instrument via the cleaning port.
- the surgical instrument provides for rotation of the surgical tool assembly about the longitudinal axis of the tool assembly within the handle. This allows the user to position the tool assembly in any desired angular orientation while being used.
- the sleeve preferably comprises a circumferential groove which allows the handle to retain the sleeve against longitudinal movement regardless of the rotational orientation of the tool assembly.
- the extension of the surgical instrument can preferably also be sealed to the inside of the sleeve.
- an O-ring is mounted in a groove on the extension. The O-ring contacts the inside surface of the sleeve. This seal prevents body fluids and gases from migrating toward the proximal end of the tool assembly during use. It also serves to direct cleaning fluid toward the jaw assembly at the distal end of the tool assembly during the cleaning process.
- the surgical instrument can also be used to perform cautery operations. This is facilitated by an electrical connection port provided in the handle assembly.
- the present invention further provides a handle assembly for removable attachment to an elongate surgical tool assembly which extends along a longitudinal axis, the handle assembly comprising:
- the handle assembly can also be provided in a dual-port configuration in which pivoting the trigger provides translation motion in both of the two ports.
- the tool assembly can be inserted into either of the ports.
- the handle assembly is provided in a rotatable-port configuration.
- the rotatable-port handle may have only a single port in which tool assemblies can be retained and actuated.
- the port is part of the handle base or housing.
- the housing can be positioned in one of two possible orientations relative to a finger loop and thumb loop of the handle. The orientation can be changed back and forth between a pistol configuration and a scissor configuration without removing the tool assembly from the handle. Thus, the surgeon can select a comfortable position for the operation being performed without a substantial interruption.
- the surgical instrument of the present invention provides numerous advantages over other instruments.
- the cleanability and replaceability of the tool assemblies and jaw assemblies in the present surgical instrument provide the instrument with a versatility not found in prior systems.
- the ability to disengage the extension from the jaws facilitates the cleaning and replacement features.
- the extension is pulled back toward the proximal end of the tool assembly to a cleaning position In this position, the extension is disengaged from the jaws.
- An O-ring on the extension may be located proximal to a cleaning port. Cleaning fluid entering via the cleaning port is therefore directed toward the distal end of the tool assembly.
- the present invention provides several multiple use applications for the surgical instrument.
- the tool assembly may be used three to four times depending upon the sharpness of the jaws. Between uses, the tool assembly is removed and may be cleaned via the cleaning port. The disengagement of the extension and the jaws allows the tool assembly to be placed in the cleaning configuration.
- the jaw assembly is detachable from the sleeve, it may be changed for every use. Thus, each operation is performed with fresh sharp jaws. Once again, it is the disengagement of the extension from the jaws of the present invention which provides this advantage.
- the jaw assembly can be easily removed and replaced, different jaw assemblies can be used on the same instrument during surgery. For example, the surgeon can readily change from a scissor to a grasper during an operation.
- proximal refers to a direction or a location which is toward the handle end of the surgical instrument.
- distal refers to a direction or a location which is toward the extreme end of the assembled surgical instrument which is further from the handle of the instrument.
- distal end of a scissor jaw assembly which may be assembled in an endoscopic surgical instrument would consist of the tips of the scissor blades.
- Figure 1 is a schematic side elevational view of an embodiment of the surgical instrument of the present invention.
- Figure 2 is a schematic side elevational view of a handle assembly of the surgical instrument of Figure 1.
- Figure 3 depicts the blades of a scissor type jaw assembly in accordance with the present invention in an open position.
- Figure 4 depicts the blades of a scissor type jaw assembly in accordance with the present invention in a closed position.
- Figure 5 depicts a scissor type jaw assembly and extension in accordance with the present invention with the extension out of engagement with the jaw assembly.
- Figure 6 depicts the distal end of the tool assembly of the embodiment of Figure 1.
- Figure 7 is a cut-away view depicting the jaw assembly actuation mechanism of the surgical instrument of Figure 1 with the jaws in the open position.
- Figure 8 is a cut-away view depicting the actuation mechanism of the surgical instrument of Figure 1 with the jaws in the closed position.
- Figure 9 depicts the extension of the surgical instrument of the present invention.
- Figure 10 shows the tool assembly of the surgical instrument of Figure 1 in a cleaning configuration.
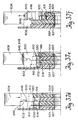
- Figure 11 is a cross-sectional view of the distal end of a sleeve in accordance with an embodiment of the present invention.
- Figure 12 is a cross-sectional view of the distal end of a sleeve spread open to receive a jaw assembly in accordance with the present invention.
- Figure 13 is a cross-sectional view of the distal end of a sleeve spread open and receiving a jaw assembly in accordance with an embodiment of the present invention.
- Figure 14 is a cross-sectional view of the distal end of a sleeve with a jaw assembly installed in accordance with the present invention.
- Figure 15 is a perspective view of an insertion tool loaded with a jaw assembly.
- Figure 16 is a perspective view of the insertion tool and the distal end of a sleeve before the jaw assembly insertion process.
- Figure 17 is a perspective view-of the insertion tool and the distal end of a sleeve during the jaw assembly insertion process.
- Figure 18 is a perspective view of the insertion tool and the distal end of a sleeve after the jaw assembly insertion process.
- Figure 19 is a perspective view of an embodiment of an insertion/removal tool for use with the present invention.
- Figure 20 is a cross-sectional view of an embodiment of a removable jaw assembly having a compressible pivot in accordance with the present invention.
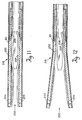
- Figure 21a is a schematic side elevational view of another embodiment of the surgical instrument of the present invention.
- Figure 21b depicts an embodiment of the disposable tool assembly of the present invention used in the instrument of Figure 21a.
- Figures 22a-22c depict an embodiment of the surgical scissors used in the instrument of Figures 21a and 21b.
- Figures 23a-23b depict an embodiment of a dual-port handle in accordance with the present invention.
- Figure 24 is a schematic side elevational view of an embodiment of a rotatable-port handle assembly in accordance with the present invention.
- Figure 25 is a schematic side elevational view of the rotatable-port handle assembly of Figure 24 showing the tool actuation process.
- Figure 26 is a schematic exploded perspective view of the rotatable-port handle assembly.
- Figure 27 is a schematic side elevational view of the housing and finger loop of the rotatable-port handle assembly.
- Figure 28a is a schematic side elevational view of the rotatable-port handle assembly in the scissor configuration.
- Figure 28b is a cross-sectional view taken at line A-A of Figure 28a.
- Figure 29 is a schematic elevational view of the housing of the rotatable-port handle assembly.
- Figure 30 is a schematic elevational view of the finger loop of the rotatable-port handle assembly.
- Figure 31 is a schematic elevational view of the thumb loop of the rotatable-port handle assembly.
- Figure 32a is a schematic elevational view of the drive cog of the rotatable-port handle assembly.
- Figure 32b is a schematic elevational view of the drive cog of Figure 32a rotated 90°.
- Figure 33a is a schematic elevational view of the release trigger of the rotatable-port handle assembly.
- Figure 33b is a schematic elevational view of the release trigger of Figure 33a rotated 90°.
- Figure 34 is a schematic elevational view of the slide member of the rotatable-port handle assembly.
- Figure 35a is a schematic perspective view of the release trigger and slide member of the rotatable-port handle assembly with the slide member at the top of the release trigger.
- Figure 35b is a schematic perspective view of the release trigger and slide member of the rotatable-port handle assembly with the slide member at the bottom of the release trigger.
- Figures 36a-36f are schematic side elevational views of the disks, drive cog, release trigger, and slide member of the rotatable-port handle assembly of the present invention, showing various steps in the rotation process.
- Figures 37a-37f are cross-sectional views corresponding to Figures 36a-36f.
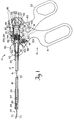
- Figure 1 is a side elevational view of an embodiment of the surgical instrument 10 of the present invention.
- Figure 1 depicts a tool assembly 12 retained in a handle assembly 14.
- the tool assembly 12 comprises an inner extension 16 located inside a sleeve 18 and a scissor type jaw assembly 66 attached to the sleeve 18 via a pivot pin 68.
- a non-conductive cover 20 covers the sleeve 18.
- the handle 14 comprises a housing or base 50 and a tool actuation trigger or thumb loop 52 pivotably mounted to the base 50 via pivot 54.
- the base 50 comprises a finger loop 51. During normal use of the instrument, the user places his fingers in the finger loop 51 to steady the base 50 and places his thumb through the thumb loop or actuation trigger 52 to actuate the tool assembly.
- the handle 14 also comprises a port 17 in which the tool assembly 12 is retained.
- the inner extension 16 is longitudinally translatable relative to the sleeve 18.
- the inner extension 16 comprises three parts: the center span 22, a proximal end 26, and a distal end 64.
- the distal end 64 of the extension 16 engages the jaw assembly 66.
- the distal end of the extension 16 engages the proximal ends of the jaws 70 and 72 to cause them to close.
- the distal end of the extension 16 engages the jaws 70 and 72 to cause them to open.
- the extension 16 is sealed to the inside surface of the sleeve 18 by O-ring 32.
- the O-ring 32 is mounted in a slot 24 in the extension 16.
- the O-ring contacts the inside surface of the sleeve 18, thus sealing the extension 16 to the sleeve 18.
- This seal prevents body fluids and gases such as carbon dioxide from traveling to the proximal end of the tool assembly 12 during surgery. It also prevents cleaning fluids from traveling to the proximal end of the tool assembly 12 during a cleaning process to be described below in detail.
- the tool assembly 12 can be rotated about its longitudinal axis as a single unit within the handle 14.
- Rotating knob 42 is attached to the sleeve 18.
- the extension 16 and sleeve 18 are coupled to each other via a pin 34 in the extension 16 and a slot 35 in the sleeve 18.
- the pin 34 is pressed into a hole 102 in the extension 16 and protrudes from the extension 16.
- a slot 35 is cut in the wall of the sleeve 18.
- the extension 16 and sleeve 18 are assembled such that the end of pin 34 protrudes into the slot 35.
- the user rotates the rotating knob 42. This imparts rotational motion to the sleeve 18. Because the extension 16 and sleeve 18 are coupled by the pin 34 and slot 35 as described above, the extension 16 also rotates. When the sleeve 18 and extension 16 are rotated, the jaw assembly 66 is carried in the rotation by pivot pin 68.
- the rotation of the tool assembly 12 is controlled such that the tool assembly 12 is rotated within certain indexed increments. This is accomplished by the index rotator 37, the spring 36, and the detent 44.
- the index rotator 37 is fixedly attached to the sleeve 18.
- the detent 44 is biased by spring 36 to engage the teeth on the outer surface of the index rotator 37.
- the deCent 44 moves in and out of meshing engagement with the grooves on the index rotator 37.
- the spring 36 provides sufficient force to the detent 44 to maintain the index rotator 37 and the tool assembly 12 stationary against inadvertent rotation.
- the tool assembly 12 is retained within the port 17 of the handle 14 by engagement of the tapered end 63 of the spring-loaded retaining knob 60 with the retention groove 62 on the rotating knob 42.
- the retaining knob 60 is spring biased by spring 61 toward the engagement position. When the tool assembly 12 is inserted into the port 17, the end 63 of retaining knob 60 engages the retention groove 62 to retain the tool assembly 12 in place.
- actuation of the jaw assembly 66 is controlled by the longitudinal translation of the extension 16 within the sleeve 18. This longitudinal translation is controlled by the actuation trigger 52 of the handle 14.
- a spool 28 is fixedly attached to the proximal end 26 of the extension 16. The spool 28 is retained on the proximal end 26 of the extension 16 by retaining clip 30.
- the extension 16 When the actuation trigger 52 is rotated in the counter-clockwise direction, the extension 16 is translated forward toward the distal end of the surgical instrument 10. This distal translation of the extension 16 causes the jaws 70 and 72 to open.
- the actuation trigger 52 is spring biased by return torsion spring 55.
- the return spring 55 biases rotation of the actuation trigger 52 in the counter-clockwise direction. This bias tends to translate the extension 16 toward the distal end of the tool assembly 12 and thus tends to open the jaws 70 and 72.
- One end 43 of the return spring 55 is fixedly attached to the actuation trigger 52, and the other end 41 is fixedly attached to the handle base 50.
- the return spring 55 is radially compressed before attachment to the instrument such that the counter-clockwise rotational bias is attained. In the embodiment of Figure 1, as shown, the return spring 55 is compressed as far as possible because the actuation trigger 52 is rotated as far as possible in the clockwise direction in opposition to the bias.
- the surgical instrument 10 of the present invention also provides for the electrical connections required for cautery procedures. These electrical connections are effected via the electrical connection port 49 in the handle 14.
- the electrically conducting spring clip 46 is exposed to the interior of the port 49.
- the clip 46 runs distally toward the front of the handle to spring 36 and detent 44.
- the distal end of the spring clip is squeezed between the spring 36 and the detent 44 thus making a connection to the index rotator 37.
- the spring clip 46, the detent 44, the index rotator 37, the sleeve 18, and the jaw assembly 66 are all electrically conducting. Therefore, an electrical connection is made from the electrical connection port 49 to the jaw assembly 66.
- an electrical connection can be made via an electrical connector 48 inserted into electrical connection port 49.
- the non-conductive cover 20 on the outside of the sleeve 18 serves to insulate the electrified sleeve 18 from tissue in the body. This allows the user to limit the cautery operation to a well defined area of tissue.
- the cool assembly 12 and the handle 14 are detachable.
- the user slides the spring-loaded retaining knob 60 down in the direction shown by arrow 59. This causes the end 63 of the knob 60 to disengage the retention groove 62 in the rotating knob 42.
- the user may grasp the rotating knob 42 and pull the tool assembly 12 distally out of the port 17.
- the user may, while holding knob 60 down, rotate the actuation trigger 52 as far as possible in the counter-clockwise direction. This will cause tab 56 to disengage translation groove 65 in spool 28.
- the shoulder on the front or distal surface of tab 58 will engage the back side of spool 28 to urge the extension 16 and the tool assembly 12 out of the port 17. After the spool 28 clears the tabs 56 and 58, the user may simply slide the tool assembly 12 the rest of the way out of the port 17.
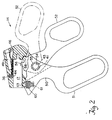
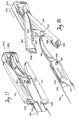
- FIG 2 shows the handle 14 of the surgical instrument 10 of Figure 1 with the tool assembly 12 removed.
- the user first rotates the actuation trigger 52 as far as possible in the counter-clockwise direction (shown in phantom lines). This causes tab 58 to protrude into the port 17.
- the user simply slides a tool assembly 12 into the port 17. Because the end 63 of the retaining knob 60 is tapered, the user need not slide the knob 60 out of the way to allow the tool assembly 12 to slide back into the port 17.
- the knob 60 will simply be moved out of the way by interfering pieces of the tool assembly 12 until the retention groove 62 in the rotating knob 42 is engaged by the end 63 of the knob 60.
- the spool 28 slides back within the port 17. As it does so, the back side of the spool 28 engages the shoulder on the front or distal surface of tab 58 protruding into the port 17. The rearward motion of the spool 28 forces the tab 58 out of the way by forcing the actuation trigger 52 to rotate in the clockwise direction. The back ridge portion 29 of the spool 28 then engages with the groove 57 between tabs 56 and 58 on the actuation trigger 52. Finally, as the spool 28 slides all the way back into the port 17, the rotation of the actuation trigger 52 causes the tab 56 to engage the translation groove 65 on the spool 28. When the end 63 of the knob 60 engages with the retention groove 62 on the rotating knob 42, the tool assembly 12 is retained within the handle 14 and is ready for use
- the tool assembly 12 is also provided with a cleaning port 40 in the rotating knob 42.
- This port 40 allows for the introduction of cleaning fluid into the tool assembly 12.
- the port 40 is a luer taper configuration.
- a syringe full of cleaning fluid (not shown) having an end with a mating luer taper may be inserted into the port 40.
- the cleaning fluid is then introduced into the interior of the tool assembly 12 between the extension 16 and the inside surface of the sleeve 18. As will be described below in detail, this cleaning process may be performed when the tool assembly 12 is removed from the handle 14.
- the proximal end of the port 17 prevents the spool from moving back proximally far enough for the O-ring seal 32 to travel to the proximal side of the cleaning port 40.
- the O-ring seal 32 positioned as shown in Figure 1, prevents body fluids from traveling up the tool assembly 12 to the handle 14.
- the cleaning process is carried out with the tool assembly detached from the handle. With the tool assembly detached, the proximal end of the port 17 does not interfere with the travel of the extension 16.
- the O-ring seal 32 can be positioned on the proximal side of the cleaning port 40. Cleaning fluid enters the tool assembly 12 via the port 40 and runs to the distal end of the tool assembly 12. In other embodiments, the proximal end of the port 17 does not inhibit travel of the extension 16. In these embodiments, the cleaning process can be performed with the tool assembly attached to the handle.
- FIGS 3 and 4 depict a scissor type embodiment of the jaw assembly 66 used in the surgical instrument 10 of the present invention shown in open and closed positions, respectively.
- jaws 70 and 72 are shown pivotably mounted to each other via pivot 68.
- Jaw 70 comprises cutting surface 74
- jaw 72 comprises cutting surface 76.
- Depressions 78 and 80 in jaws 70 and 72 respectively allow the jaws to mesh properly as they pivot throughout their range of operation.
- the distal end of each jaw is twisted with respect to the proximal end of each jaw such that the jaws are biased toward each other by opposing angles to provide a proper positive cutting action during operation.
- the twist angle of each jaw is approximately 2.5°.
- Each jaw also comprises an open ended slot at its proximal end.
- Jaw 72 comprises open ended slot 82
- jaw 70 comprises open ended slot 84.
- the open ended slots 82 and 84 are engageable by drive pin 86. It should be noted that drive pin 86 is not part of the jaw assembly 66; it is coupled to the distal end 64 of the inner extension 16 as described below in connection with Figure 9.
- Figure 3 shows the drive pin 86 positioned as far as possible toward the distal end of the jaw assembly 66.
- the jaws are in an open position. If the drive pin 86 is moved toward the proximal ends of the slots 82 and 84, the jaws 70 and 72 will tend to move toward a closed position. As the drive pin 86 is moved proximally, it engages the inner wall 87 of slot 82 and the inner wall 88 of slot 84. This causes the inner walls of the slots to spread apart from each other and further causes the jaws 70 and 72 to close.
- FIG. 4 depicts the jaws 70 and 72 in the closed position.
- Drive pin 86 has been moved out to the proximal ends of slots 82 and 84. It should be noted that further proximal translation of the drive pin 86 will cause the drive pin 86 to disengage the slots 82 and 84, but such translation is normally prevented by the handle assembly.
- the proximal ends of the jaws 70 and 72 are formed at angles which ensure proper engagement of the drive pin 86.
- distal translation of the drive pin 86 will cause it to engage the slots regardless of the pivotal orientation of the blades with respect to each other, even though the slots are not aligned. This effect is due to the angles at which the proximal ends of the jaws are formed.
- the drive pin 86 can be translated within the slots 82 and 84 toward the distal end of the jaws 70 and 72. As the drive pin 86 moves along the slots, it engages inner wall 92 of slot 82 and inner wall 90 of slot 84 to drive the blades apart.
- the angled side surfaces 94 and 96 on jaws 72 and 70 respectively are provided to prevent the jaws from interfering with the sleeve 18 when the jaws are in an open position. They also serve as a stop to prevent the jaws 70 and 72 from pivoting too far when the drive pin 86 is disengaged from the slots.
- Figure 5 depicts a jaw assembly 66 and the distal end of the extension 16 of the present invention.
- the distal end of the extension 16 comprises a clevis 104 which carries the drive pin 86.
- the drive pin 86 spans a gap 106 in the clevis 104.
- the clevis 104 and drive pin 86 are shown out of engagement with the proximal ends of the jaws 70 and 72.
- Figure 6 depicts the distal end of the tool assembly 12.
- the jaw assembly 66 is shown attached to the sleeve 18 by the pivot pin 68.
- the distal end of the extension 16 is shown within the sleeve 18.
- the extension 16 comprises the distal end of the center span 22 attached to the clevis 104. The details of the extension 16 will be described below in detail.
- the drive pin 86 carried by the clevis 104 is shown engaging the proximal ends of the jaws 70 and 72.
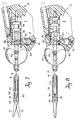
- Figures 7 and 8 depict the relationship between the position of the spool 28 within the port 17 of the handle 14 and the position of the jaws 70 and 72.
- Figure 7 depicts the configuration in which the jaws are open
- Figure 8 depicts the configuration in which the jaws are closed.
- the tool assembly 12 is shown retained in the port 17 of the handle 14.
- the end 63 of the spring-loaded retention knob 60 is shown in engagement with the retention groove 62 on the rotating knob 42.
- spool 28 is shown translated toward the distal end of the port 17. Consequently, extension 16 is translated toward the distal end of the tool assembly 12.
- Pin 34 in the extension 16 is shown at the distal end of slot 35 in the sleeve 18.
- drive pin 86 is located at the distal ends of slots 82 and 84 of the jaws 70 and 72. As a result, the jaws are in the open position.
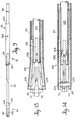
- Figure 9 shows the details of an extension 16 used in the surgical instrument of Figure 1.
- the extension 16 is comprised of three sections. These are the proximal end 26, the center span 22, and the distal end 64.
- the spool 28 is retained on the proximal end 26 of the extension 16.
- the spool 28 slides over the proximal end of the extension 16 and rests against shoulder 100.
- a retaining clip 30 slides into groove 98 to retain the spool 28 in place.
- Pin 34 (see Figure 1) is pressed into hole 102 such that the end of pin 34 protrudes out one side of hole 102.
- O-ring seal 32 (see Figure 1) rests within groove 24.
- the center span 22 of the extension 16 is attached to the proximal end 26 of the extension 16 via hole 25 in the proximal end of the extension 16.
- the center span 22 is inserted into the hole 25 and permanently staked in place.
- the center span 22 is staked to a clevis 104 located at the distal end 64 of the extension 16.
- the center span 22 is inserted in hole 103 in the clevis and permanently staked in place.
- the drive pin 86 (see Figure 2) spans across a gap 106 in the clevis 104. This gap 106 provides clearance for the proximal ends of the jaws when the drive pin 86 engages the slots in the jaws.
- Figure 10 depicts the cleaning configuration of the tool assembly 12.
- the tool assembly 12 has been removed from the handle 14.
- the extension 16 has been pulled back within the sleeve 18 to a cleaning position.
- Pin 34 in the extension 16 is shown at the extreme proximal end of the slot 35 in sleeve 18.
- the extension 16 in the cleaning position, is pulled back proximally far enough within the sleeve 18 to allow the O-ring seal 32 to move to the proximal side of the cleaning port 40.
- Cleaning fluid is introduced into the tool assembly 12 from syringe 101 via the cleaning port 40. Because the extension 16 is in the cleaning position, the O-ring seal 32 prevents the cleaning fluid from traveling toward the proximal end of the tool assembly 12. The cleaning fluid enters the port 40 and travels down the tool assembly 12 and out to the jaw assembly 66. This effects a cleaning operation of the inside of the tool assembly 12. Also, the fluid running out of the distal end of the tool assembly 12 cleans the jaw assembly 66 as well.
- the drive pin 86 at the distal end of the extension 16 is no longer in engagement with the proximal ends of the jaws 70 and 72.
- the extension 16 has been drawn back toward the proximal end of the tool assembly 12 such that the pin 86 has disengaged the slots at the proximal ends of the jaws.
- the open ended slots 82 and 84 at the proximal ends of the jaws 72 and 70 facilitate the full translation of the extension to properly position the O-ring seal 32 during the cleaning operation.
- the jaws of the present invention may be removeably attached to the distal end of the sleeve. This means of jaw assembly attachment may be used in any embodiment of the surgical instrument. A jaw assembly is replaced by simply removing it from the sleeve and installing a new jaw assembly as described below.
- the removable jaw assembly can be implemented by different approaches.
- the distal end of the sleeve is made of an elastic material.
- a jaw assembly 66 is installed or removed from the sleeve by spreading its distal end open to provide clearance for the pivot pin 68 of the jaw assembly 66. When the jaw assembly 66 is in position within the sleeve, the distal end closes to hold the jaw assembly in place.
- FIGS 11 and 12 are cross-sectional views of the distal end of a sleeve 318 used in this first jaw assembly attachment technique.
- a tubular insert 232 forms the end of the sleeve 318.
- the insert 232 is made of an elastic material such as a spring steel.
- Slots 230, 236, and 237 are cut into the wall of the insert by electronic discharge machining (EDM) or some other means. It should be noted that slots identical to slots 230, 236, and 237 are located on the opposite wall of the tubular insert 232. These are not seen in the cross-sectional elevational views of Figures 11 and 12.
- Holes 234 and 235 are located in line on opposite sides of the slot 230. These holes are adapted to receive the pivot pin 68 of the jaw assembly 66 (not shown).
- the slot 230 is made sufficiently wide to provide clearance for the proximal ends of the jaws 70 and 72 when they are inserted into the end of the sleeve 318.
- a jaw assembly 66 is installed on the distal end of the tubular insert 232 by spreading the end of the tubular insert 232 at the slot 230 as shown in Figure 12.
- the ends of the slot 230 are spread sufficiently far apart to allow the pivot pin 68 to pass into the distal end of the tubular insert 232 and be engaged by holes 234 and 235.
- Slots 236 and 237 act together as a "living hinge" to allow the tubular insert 232 to spring open and closed without causing distortions in the material.
- the tubular insert 232 is shown sprung open to receive the jaw assembly 66.
- the sleeve 318 is sprung open sufficiently wide to allow the pivot pin 68 of the jaw assembly 66 to pass into the slot 230.
- the sleeve 318 is released to allow it to close over the pivot pin 68.
- Figure 13 is a cross-section of the distal end of the sleeve 318 showing the tubular insert 232 sprung open and receiving the jaw assembly 66. The end has been sprung sufficiently wide to allow the pivot pin 68 to pass through the slot 230. Also shown is the clevis 104 at the distal end of the extension 16. The clevis 104 carries the drive pin 86 at its distal end. Because the jaw assembly 66 has not been completely inserted into the insert 232, the drive pin 86 does not yet engage the proximal ends of jaws 70 and 72.
- Figure 14 depicts the distal end of the sleeve 318 after the jaw assembly 66 has been installed.
- the insert 232 has sprung closed again, the holes 234 and 235 engaging the pivot 68 of the jaw assembly 66.
- the drive pin 86 at the distal end of the clevis 104 is now shown to be engaging the slots in the proximal ends of the jaws 70 and 72.
- translation of the extension 16 toward the distal end of the sleeve 318 will cause drive pin 86 to drive the jaws 70 and 72 to the open position as previously described.
- FIG 15 is a perspective view of an insertion tool 300 in accordance with the present invention used to install and remove jaw assemblies in the spreadable sleeve embodiment of the surgical instrument.
- the insertion tool 300 is shown loaded with a jaw assembly 66.
- the jaw assembly 66 rests in a housing or tray 302 of the insertion tool 300.
- the distal ends of the jaws rest against the inside wall 304 of the tray 302.
- the pivot 68 rests inside a slot 306 in the back side of the tray 302 (see Figure 20).
- Levers 312 and 314 are pivotably mounted to the tray 302 via pivot pins 320 and 322 respectively.
- the proximal ends 315 and 317 of levers 312 and 314 comprise wedges 324 and 326, respectively.
- the wedges 324 and 326 are shaped to engage the slots 230 on the tubular insert 232 at the distal end of the sleeve 318.
- the levers 312 and 314 are pivotable about pivot pins 320 and 322 between an open position and a closed position.
- Figure 15 depicts the levers in the closed position.
- the wedges 324 and 326 engage the slots 230 on the tubular insert 232 of the sleeve 318.
- the wedges engage the slots 230 to spread the end of the tubular insert 232 wide enough to allow the jaw assembly 266 to be inserted into the insert 232.
- the slot 306 in the tray 302 of the insertion tool 300 allows the insertion tool to be removed from the assembled sleeve 318 and jaw assembly 66.
- Figures 16, 17, and 18 are perspective views showing three steps in the jaw assembly insertion process.
- Figure 16 shows the distal end of the sleeve 318 without a jaw assembly 66 installed.
- the insertion tool 300 is shown with a jaw assembly 66 about to be installed on the sleeve 318.
- the non-conductive cover 20 is shown cut away so that details of the sleeve 318 can be viewed.
- the levers 312 and 314 are pivoted to the closed position.
- the insertion process begins as the insertion tool 300 is moved in the direction of arrow 231. Wedges 324 and 326 engage slots 230 to spread open the end of the sleeve 318. The proximal end of the jaw assembly 66 slides into the distal end of the sleeve 318.
- the holes 234 and 235 are aligned with the pivot 68 such that when the sleeve 318 is allowed to spring closed again, the jaw assembly 66 will be held within the sleeve 318 by the engagement of the holes 234 and 235 with the pivot 68.
- Figure 18 depicts the distal end of the sleeve 318 with the jaw assembly 66 installed.
- the sleeve 318 has closed down such that the pivot pin 68 of the jaw assembly 66 is retained in holes 234 and 235.
- the insertion tool 300 is shown in proximity to the sleeve 318 without a jaw assembly 66.
- the empty insertion tool 300 may be discarded or it may be retained for removal of a dull jaw assembly 66 from another sleeve 318.
- Figure 19 is a perspective view of an insertion/removal tool 400 for use with the present invention.
- the insertion end 401 of the tool 400 is similar to the insertion tool 300 described above in connection with Figure 15.
- a jaw assembly 66 is loaded in the housing 402 and is ready for insertion into a sleeve of a surgical tool assembly.
- the removal end 403 of the insertion/removal tool 400 is identical to the insertion end 401, except that a jaw assembly is not loaded in the housing 405.
- the removal end 403 is used to remove a jaw assembly 66 from the end of a tool assembly as described above in connection with Figures 16-18.
- the insertion/removal tool 400 is used to change jaw assemblies on a tool assembly. First, the removal end 403 is used to remove the old jaw assembly. After the old jaw assembly is removed, the insertion end 401 is used to install a fresh one. After the process is completed, the insertion/removal tool 400 with the old jaw assembly may be discarded.
- Figure 20 depicts another embodiment of a removable jaw assembly 700.
- the jaws 770 and 772 are attached to each other by a compressible pivot 701.
- the pivot 701 holds the jaw assembly 700 in place in the distal end of tool assembly sleeve.
- the compressible pivot 701 comprises two pivot ends 702 and 704 biased away from each other by partially compressed coil spring 708.
- the jaw assembly 700 is assembled by first installing pivot end 704 in the void 706 in tubular member 705. Next, the coil spring 708 is installed. The pivot end 702 is forced into the void 706 against the spring force of the coil spring 708. The pivot ends 702 and 704 and the spring 708 are then staked in place within the void 706 of the tubular member 705.
- the tubular member 705 is then inserted through a spring washer 707 and then through holes in the jaws 703 and 711.
- a flange 709 is pressed onto the tubular member 705 to hold the jaw assembly 700 together.
- the spring washer 707 maintains compression between the jaw blades 703 and 711 to ensure proper operation.
- the pivot ends 702 and 704 are compressed toward each other.
- the jaw assembly 700 is then made to slide into the distal end of the sleeve.
- the ends 702 and 704 come into alignment with holes through opposite walls of the sleeve, they snap into engagement with the holes to hold the jaw assembly 700 in place.
- the pivot ends 702 and 704 are compressed toward each other sufficiently to allow them to clear the holes in the walls of the sleeve.
- the jaw assembly 700 is then caused to slide out of the sleeve.
- Figure 21a depicts another embodiment 710 of the surgical instrument of the present invention.
- Tool assembly 712 is removably attached to handle 714.
- the tool assembly 712 (shown in Figure 23b) is attached to the handle 714 by inserting its proximal end into space 716 via port 718.
- the tool assembly 712 comprises an inner extension 720 within an outer sleeve 722.
- the outer sleeve 722 can translate back and forth over extension 720.
- a retaining clip 726 is inserted through space 728 in handle 714 and engages groove 724 in the extension 720 to retain the extension 720 in a fixed longitudinal position relative to the handle 714.
- a spool 730 is attached to the outer sleeve 722. Groove 732 on the spool 730 engages tab 734 on trigger 736.
- the trigger 736 is mounted to handle 714 such that it pivots with respect to the handle 714 at pivot 738. When trigger 736 is moved in relation to handle 714, spool 730 moves longitudinally along space 716. Thus, sleeve 722 is caused to translate with respect to extension 720.
- tool assembly 712 comprising surgical scissors 740.
- the scissors 740 are mounted to extension 720. Translation of the outer sleeve 722 with respect to the extension 720 causes the scissors 740 to open and close. Therefore, the trigger 736 on the handle 714 is used to control the opening and closing of the scissors 740. As the trigger 736 pivots toward the handle 714, the sleeve 722 translates relative to the extension 720 toward the back (proximal end) of the instrument 710. This causes the scissors 740 to close. Moving the trigger 736 away from the handle 714 causes the sleeve 722 to translate forward (toward the distal end of the instrument 710). This in turn causes the scissors 740 to open.
- the scissors 740 will be discussed below in greater detail in connection with Figures 22a-22c.
- Tool assembly 712 also comprises a rotator knob 742.
- the rotator knob 742 is attached to the outer sleeve 722.
- the knob 742 By turning the knob 742, the scissors 740 can be placed in a desired rotational orientation.
- the rotation of the sleeve 722 causes the scissors 740 to rotate because of the mechanical coupling between the sleeve 722 and the scissors 740.
- the rotation is in 45° increments indicated by graduations on the knob 742.
- Figure 21b depicts the tool assembly 712 of this embodiment detached from the handle 714.
- the tool assembly 712 comprises the inner extension 720, the outer sleeve 722, the spool 730, the retaining clip 726, the rotator knob 742, and the scissors 740. Because of the ease with which the tool assembly 712 can be separated from the handle 714, the tool assembly 712 can be made disposable.
- retaining clip 726 is removed from groove 724 in the extension 720. This allows the entire tool assembly 712 to move freely within space 716.
- trigger 736 is pulled back to a release position such that it is in line with the axis of the tool assembly 712.
- tab 734 disengages from groove 732.
- tab 735 engages the back of the spool 730 to slide the tool assembly 712 toward the front of the handle 714. The tool assembly 712 can then be removed from the handle 714.
- the trigger 736 is again pulled back to the release position. This causes tab 735 to protrude almost perpendicularly into space 716.
- the tool assembly 712 is inserted into port 718 and is slid toward the back of space 716.
- the back of spool 730 engages tab 735 as the tool assembly 712 is forced back.
- trigger 736 pivots so as to allow tab 734 to engage groove 732 in the spool 730.
- the two tabs 734 and 735 in combination act as a gear meshing with the back of spool 730 to ensure that when the tool assembly 712 is installed, the trigger 736 will properly actuate the scissors 740.
- retaining clip 726 is inserted into groove 724 in the extension 720 to retain the extension 720 against longitudinal movement.
- Figures 22a-22c depict an embodiment 840 of the surgical scissors 740 of Figures 21a and 21b of the present invention.
- Figure 22a is a view of the scissors 840 in an open position;
- Figure 22b is a view of the scissors 840 closed;
- Figure 22c is a view rotated 90° from the views of Figures 22a and 22b showing the scissors 840 closed.
- jaws 800 and 802 are pivotably mounted to the extension 720 by pivot pin 806.
- Drive pin 816 is mounted to outer sleeve 722 through curved slots 904, 906.
- Jaw 900 comprises slot 904, and jaw 902 comprises slot 906.
- the handle assembly of the present invention can also be provided in a dual-port configuration. In this configuration, pivoting the trigger provides translation motion in both of the two ports. The tool assembly can be inserted into either of the ports. When the trigger is pivoted with respect to the handle, the jaws are pivoted between open and closed positions.
- FIGs 23a and 23b depict an embodiment of a dual-port surgical tool handle 1014 of the present invention.
- the surgical instrument embodiment of Figure 21a and 21b is used.
- the dual-port handle 1014 allows the tool assembly 712 to be inserted into either of two ports 1018 and 1019.
- the ports 1018 and 1019 are oriented at an angle to each other to allow the surgeon more flexibility in using the tool.
- the surgeon may choose the handle port to be used based on ease of use, comfort, or any number of factors affecting the surgical procedure to be performed.
- a retaining clip 726 is inserted into slot 724 in the end of extension 720.
- Spool 730 is engaged by a mechanism to translate sleeve 722 back and forth over extension 720.
- trigger 1020 pivots about pin 1022.
- Gear teeth 1024 on wheel 1026 at the end of trigger 1020 mesh with gear teeth 1028 on wheel 1030 to rotate wheel 1030 about pin 1032.
- wheel 1026 turns in the counterclockwise direction.
- wheel 1030 rotates in the clockwise direction.
- the wheels 1026 and 1030 reverse their directions of rotation.
- tab 1040 on wheel 1026 engages spool 730 to translate sleeve 722 back and forth over extension 720. If the tool assembly 712 is installed in port 1019 (see Figure 23b), tab 1042 on wheel 1030 engages spool 730 to translate the sleeve 722.
- the handle assembly of the present invention can also be provided in a rotatable-port or universal-port configuration.
- the rotatable-port handle assembly comprises a base or housing which has a single port in which a tool assembly 12 is retained and actuated.
- a finger loop and a thumb loop or actuation trigger are pivotably mounted to the housing.
- relative rotational motion between the thumb loop and the finger loop provides translational motion to the port to actuate the tool assembly.
- the rotatable-port handle 500 is operable in either of two configurations -- a pistol configuration and a scissor configuration.
- the pistol configuration is depicted in Figure 24.
- the finger loop 550 is fixed to the housing 502 in the orientation shown.
- the thumb loop or actuation trigger 552 is pivotable relative to the finger loop 550 to actuate the tool assembly 12.
- the scissor configuration is shown in Figure 28a.
- the finger loop 550 is fixed to the housing 502 in the orientation shown.
- the thumb loop 552 is pivotable relative to the finger loop 550 to actuate the tool assembly.
- the finger loop 550 and thumb loop 552 can be readily positioned in either the pistol or scissor configuration.
- a release trigger 602 locks the handle assembly 500 in either of the positions.
- the release trigger 602 is rotated to its open position to release the handle 500 from its present configuration.
- the thumb loop 552 and finger loop 550 are then rotated until the release trigger 602 locks them in the new position.
- Figure 26 shows the interaction of the parts of the rotatable-port handle assembly 500.
- the housing 502 and top cover 503 come together to form the port 517 for a tool assembly (not shown).
- the housing 502 is formed with a housing disk 627.
- the housing disk 627 has a pistol configuration notch 620 and a scissor configuration notch 632 formed in its outer circumference.
- the finger loop 550 is formed with a finger disk 624 which lays over the housing disk 627 when the handle 500 is assembled.
- the release trigger 602 is pivotably mounted to the finger loop 550.
- the trigger key 612 engages finger notch 618 on the finger disk 624 and notch 620 on the housing disk 627 when the handle is in the pistol configuration. In the scissor configuration, the trigger key 612 engages notches 618 and 632.
- a slide member 600 is coupled to the release trigger 602.
- the slide member 600 is permitted to slide along the release trigger 602 guided by a rail 646 on the release trigger 602 mated with a groove 648 in the slide member 600.
- the slide member 600 has a slide key 610 which does not engage the notch 618 on the finger disk 624. So, even when the trigger key 612 is engaged with notch 618, the slide member 600 is free to slide independent of the release trigger 602.
- the thumb loop 552 is formed with a thumb disk 622 having a notch 616 formed in its outer surface.
- the thumb disk 622 lays over the finger disk 624 in the handle 500, and a drive cog 504 lays over the thumb disk 622.
- the drive cog 504 is formed with a tab 556 which actuates the tool assembly when the drive cog 504 is assembled in the instrument.
- the drive cog 504 is fixed to the thumb disk 622.
- the drive cog 504 rotates with it to actuate the tool assembly.
- the thumb disk 622 and drive cog 504 are held together by the slide key 610.
- the slide key 610 engages thumb notch 616 and one of the notches 614 and 630 on the drive cog 504.
- the slide key 610 engages notch 616 and the drive cog pistol configuration notch 614.
- the scissor configuration the slide key 610 engages notch 616 and the scissor configuration notch 630.
- the release trigger 602 is in its closed position.
- the trigger key 612 engages notches 618 and 620
- the slide key 610 engages notches 614 and 616.
- the thumb loop 552 is rotated relative to the finger loop 550 to actuate a tool assembly.
- the slide member 600 slides along the release trigger 602, carried by the engagement between the notches 614, 616 and the slide key 610.
- the slide key 610 fixes the drive cog 504 to the thumb loop 552.
- the tab 556 translates within the port 517 to actuate the tool assembly.
- FIG 24 is a side elevational view of the rotatable-port or universal-port handle assembly 500 in accordance with the present invention.
- the handle assembly 500 comprises the housing or base 502 having the port 517 in which a tool assembly 12 is retained and actuated in accordance with the foregoing description.
- the thumb loop or actuation trigger 552 and the finger loop 550 are pivotably mounted to the housing 502 by pivot 554.
- the thumb loop 552 and finger loop 550 are pivotable relative to each other and relative to the housing 502.
- the drive cog 504 is pivotably mounted to the finger loop 550, the thumb loop 552 and the housing 502 by pivot 554.
- the drive cog 504 comprises the tab 556 on its outer diameter which engages the translation groove 65 in the spool 28 of a tool assembly 12 as previously described. As the drive cog 504 is caused to rotate about pivot 554, the spool 28 is translated back and forth to actuate the tool assembly 12.
- the release trigger 602 is pivotably mounted to the finger loop 500 by pivot 604.
- a slide member 600 is slidably mounted on the release trigger 602.
- the release trigger 602 comprises a depression end 606 and a key end 608.
- the trigger key 612 is located at the key end 608 of the release trigger 602.
- the slide key 610 of the slide member 600 is shown in Figure 24 in alignment with the trigger key 612. Thus, in the elevational view, the trigger key 612 cannot be seen because it is behind the slide key 610 of the slide member 600.
- the slide key 610 engages notch 614 on the outer surface of the drive cog 504 and notch 616 on the thumb disk 622 of the thumb loop 552 during actuation of the tool assembly 12. This eliminates rotational movement between the drive cog 504 and the thumb loop 552. Thus, when the thumb loop 552 is rotated about pivot 554, the drive cog 504 is carried with it. As the drive cog 504 rotates, tab 556 causes the spool 28 to translate longitudinally within the port 517 to actuate the tool assembly 12.
- the finger loop 550 is prevented from rotating with respect to the housing 502 by the release trigger 602.
- the trigger key 612 on the release trigger 602 engages notch 618 on the finger disk 624 of the finger loop 550 and notch 620 on the housing disk 627 (see Figure 24) on the housing 502.
- the finger loop 550 and the housing 502 are in a fixed relationship to each other. The interactions and relationships among the various disks, notches, and keys will be described below in greater detail.
- the release trigger 602 is spring loaded. Coil spring 626 biases the release trigger 602 in the counter-clockwise rotational direction toward the closed or engagement position depicted in Figure 24. Pressing the depression end 606 of the release trigger 602 causes the release trigger 602 to rotate in the clockwise direction about pivot 604 against the biasing force of coil spring 626. Trigger key 612 comes out of engagement with notches 618 and 620. Slide member 600 is carried with the release trigger 602 such that the slide key 610 comes out of engagement with notches 614 and 616. When the trigger 602 is released, if the notches line up with their corresponding keys, the coil spring 626 forces the trigger 602 to pivot such that the keys drop into engagement with the notches.
- the handle assembly 500 is operable in two possible configurations, the pistol configuration shown in Figure 24 and a scissor configuration shown in Figures 28a and 28b.
- the instrument may be changed from one configuration to the other by rotating the finger loop 550 and thumb loop 552 with respect to the housing 502 and the drive cog 504. As an illustration, the process of rotating from the pistol configuration to the scissor configuration will be described.
- the rotation process is carried out by depressing the release trigger 602 to release the drive cog 504 and the various disks from each other.
- the thumb loop 552 and finger loop 550 are rotated to the new position while the housing 502 and drive cog 504 remain stationary.
- the release trigger 602 closes.
- the slide key 610 on the slide member 600 drops into engagement with the notch 616 on the thumb disk 622 and a scissor configuration notch 630 on the drive cog 504 to lock the two together.
- the trigger key 612 engages the notch 618 on the finger disk 624 and a scissor configuration housing disk notch 632 (see Figure 26) to lock the handle 500 in the configuration.
- the tool assembly 12 is retained within the port 518 in a manner similar to that described for the other embodiments.
- the tapered end 563 of spring-loaded knob 560 engages the retention groove 62 in the tool assembly 12.
- a coil spring 561 biases the knob 560 toward the engagement position.
- the knob is forced to slide in the direction indicated by the arrow 559 against the biasing force of coil spring 561 until the end 563 of the knob 560 slides out of engagement with the retention groove 62.
- the taper on the end 563 of the knob 560 allows the knob 560 to be forced out of the way as the tool assembly slides into the port 517.
- the end 563 of the knob 560 snaps into engagement with the retention groove 62 as the tool assembly 12 slides all the way back into the port 517.
- a torsion spring 555 couples the drive cog 504 to the top cover 503 of the housing 502 (see Figure 26).
- the function of the torsion spring 555 is similar to that of the torsion spring 55 in the other embodiments.
- the spring 555 biases the rotation of the drive cog 504 in a clockwise direction to locate the tab 558 within the port 517 during installation of a tool assembly 12 to ensure proper installation.
- the rotatable-port handle assembly 500 also provides for electrical connections to the tool assembly 12 via electrical connection port 549.
- An electrical connector 48 is inserted in port 549.
- the spring clip 546 provides an electrical connection from the connector 48 to the index rotator 37 fixed to the tool assembly 12.
- Coil spring 536 applies force to detent 544.
- the detent 544 rides on the outer surface of index rotator 37 to provide indexed rotation of the tool assembly 12.
- the spring clip 546 is squeezed between the spring 536 and the detent 544.
- the electrical connection is provided to the tool assembly 12.
- Figure 25 depicts the operation of the handle assembly 500 during actuation of the tool assembly 12.
- the thumb loop 552 is rotated in the direction indicated by arrow 640
- the thumb disk 622 and the drive cog 504 rotate in the direction indicated by the arrow 641.
- Tab 556 imparts translational motion to the spool 28 and extension 16 of the tool assembly 12 as indicated by arrow 642 to actuate the tool assembly 12.
- the slide key 610 of the slide member 600 has engaged notch 614 in the drive cog 504 and notch 616 in thumb disk 622. Consequently, the drive cog 504 rotates with the thumb loop 552. Also, the trigger key 612 on the release trigger 602 has engaged notch 618 on the finger disk 624 of the finger loop 550 and the notch 620 in the housing disk 627. Therefore, the finger loop 550 is held stationary with respect to the housing 502.
- Figure 25 also illustrates the operation of the release trigger 602 and slide member 600 while the tool assembly is being actuated.
- the slide member 600 is carried along the release trigger 602 via the interference between the walls of the notches 614 and 616 and the slide key 610.
- the slide member 600 slides along the release trigger 602 guided by slide rail 646 in the trigger release 602 and a meshing slide groove 648 in the slide member 600 (see Figure 35b).
- the slot 650 in the slide member 600 slides along pivot 604. The slot 650 can serve to limit the travel of the slide member 600.
- FIG 26 is a schematic exploded view of the handle assembly 500 of the present invention.
- the housing 502 comprises the port 517 for a tool assembly. Also shown is the housing disk 627.
- the housing disk 627 is an integral part of the housing 502.
- the housing 502 is molded with the disk 627 formed as shown.
- the housing disk 627 comprises a notch 620 and a notch 632 on its outer diameter.
- the trigger key 612 on the release trigger 602 meshes with one of these notches. If the handle 500 is in the pistol configuration ( Figure 25), the trigger key 612 meshes with notch 620. In the scissor configuration ( Figure 28a), the trigger key 612 meshes with notch 632.
- the finger loop 550 is shown with the release trigger 602 attached at pivot 604.
- the slide member 600 is shown slideably attached to the release trigger 602.
- the slide member 600 slides along the release trigger 602 guided by the mating rail 646 in the release trigger 602 and groove 648 in the slide member 600.
- Pivot 604 passes through slot 650 in the slide member 600.
- the groove 650 and pivot 604 guide the sliding of the slide member 600 as well as limit the extent of its travel.
- the slide key 610 of the slide member 600 is shown aligned with the trigger key 612. However, this need not be the case.
- the release trigger 602 is in the closed position so that the trigger key 612 meshes with notch 618 in the finger disk 624. But, slide key 610 in the slide member 600 does not mesh with the notch 618. Therefore, when the thumb loop 552 and finger loop 550 rotate relative to each other, the slide member 600 is free to slide independent of the release trigger 602.
- the back surface 623 of the finger disk 624 contacts the front surface 629 of the housing disk 627 when the handle 500 is assembled.
- Pivot hole 652 in the housing disk 627 is aligned with pivot hole 654 in the finger disk 624.
- the finger loop 550 is positioned such that, when the housing is assembled, the trigger key 612 will mesh with notch 620 in the housing disk 627 when the release trigger 602 is in the closed position. With the trigger key 612 in notch 620, the handle 500 is in the pistol configuration. To change to the scissor configuration, the trigger 602 is depressed to disengage the trigger key 612 from the notches 618 and 620.
- the finger loop 550 is rotated in the clockwise direction until notch 618 in the finger disk 627 is aligned with notch 632 in the housing disk 627.
- the release trigger 602 then closes; the trigger key 612 falls into engagement with the notches 618 and 632 to lock the handle 500 in the scissor configuration.
- the back surface 621 of the thumb loop 552 contacts the front surface 625 of the finger loop 550 when the handle 500 is assembled.
- Pivot hole 656 in the thumb disk 622 is aligned with pivot hole 654 in the finger disk 624.
- the thumb loop 552 is shown oriented such that the notch 616 in the thumb disk 624 is aligned with notches 618 and 620 in the finger disk 624 and housing disk 627, respectively.
- the back surface 660 of the drive cog 504 contacts the front surface 662 of the thumb disk 622 when the handle 500 is assembled.
- Pivot hole 656 in the thumb disk 622 is aligned with pivot hole 658 in the drive cog 504.
- pistol notch 614 on the drive cog 504 is aligned with notch 616 on the thumb disk 622.
- the tab 556 on the drive cog 504 is oriented substantially vertically. Therefore, when the handle 500 is assembled, the tab 556 will extend into the port 517 to drive a tool assembly 12.
- the drive cog 504 must retain essentially the same rotational orientation as that shown in Figure 26. This orientation keeps tab 556 protruding into the port 517 to drive a tool assembly 12 in either configuration.
- the release trigger 602 is depressed to disengage trigger key 612 from the finger disk notch 618 and pistol configuration notch 620 on the housing disk 627.
- slide key 610 disengages thumb disk notch 616 as well as the pistol configuration notch 614 on the drive cog 504.
- the thumb loop 552 and finger loop 550 are then rotated together to the scissor position while the drive cog 504 and housing disk 627 remain substantially stationary.
- the trigger key 612 falls into engagement with the notches 618 and 632 to lock the finger loop 550 to the housing disk 627 in the scissor position.
- the slide key 610 falls into engagement with the notches 616 and 630 to lock the thumb disk 622 to the drive cog 504 in the scissor configuration.
- the rotation process is carried out with a tool assembly 12 installed in the port 517. Frictional forces inherent in the tool assembly inhibit rotation of the drive cog 504 when the trigger is in the release or open position.
- Torsion spring 555 couples the drive cog 504 to the top cover 503 of the handle 500.
- One end 666 of the spring 555 is inserted into a hole 664 in the drive cog 504.
- the other end 668 of the spring 555 is inserted in a hole in the back side of the cover 503 (not shown).
- the torsion spring 555 tends to bias rotation of the drive cog 504 and thumb loop 552 in the clockwise direction. This clockwise bias aids during installation of a tool assembly 12 into the port 517.
- tab 558 on the drive cog 504 is rotated into the port 517. During insertion of a tool assembly, the tab 558 ensures that tab 556 will rotate into proper engagement with the tool assembly.
- a pivot nut 670 passes through the pivot holes 652, 654, 656, 658 in the disks and the drive cog to hold them in position.
- a pivot screw 672 threads into the pivot nut 670 through the cover 503, the drive cog 504, and the disks to hold the handle assembly 500 together.
- the handle assembly 500 actuates a tool assembly 12 by relative rotational motion between the finger loop 500 and thumb loop 552.
- the finger loop 550 With the release trigger 602 in the closed position, the finger loop 550 is stationary with respect to the housing 502 and therefore also with respect to a tool assembly in the port 517.
- Tab 556 engages the tool assembly in the port 517.
- tab 556 on the drive cog 554 is carried back and forth within the port 517 to actuate the tool assembly.
- the thumb loop 552 and drive cog 504 coupled together by the slide key 610, rotate with respect to the finger loop 550 and housing 503, coupled together by trigger key 612.
- This independent rotation is facilitated by the sliding motion between the release trigger 602 and the slide member 600.
- slide member 600 slides along the release trigger 602.
- the slide member 602 is caused to slide by the engagement of the slide key 610 with the thumb loop notch 616 and either the pistol configuration notch 614 or the scissor configuration notch 630 on the drive cog 504.
- the slide member 600 is guided by the mating slide rail 646 on the release trigger 602 and slide groove 648 on the slide member 600.
- the handle assembly 500 is shown in the tool-assembly-closed position. That is, the relative rotational orientation of the finger loop 550 to the thumb loop 552 is such that the tab 556 is pulled back within the port 517 to close the tool assembly jaws as previously described.
- the thumb loop 552 is rotated as far as possible in the counter-clockwise direction. This can be seen by the positions of the notches 614, 616, 618, and 620 and the position of the slide member 600 with respect to the release trigger 602. The notches are all in alignment, and the slide member 600 is at the limit of its travel at the top of the release trigger 602.
- Thumb loop 552 will not rotate further in the counter-clockwise direction because groove 650 in the slide member 600 and pivot 604 will prevent the slide member 600 from sliding further along the release trigger 602. Clockwise rotation of the thumb loop 552 to open tool jaws is not inhibited by the slide member 600 because slot 650 and pivot 604 will allow the slide member 600 to slide down the release trigger 602.
- Figure 27 is a schematic side elevational view of the housing 502 and the finger loop 550 of the handle assembly 500.
- the housing 502 and finger loop 550 are shown during the rotation process.
- the thumb loop 552 and the drive cog 504 are removed in order to clearly illustrate the rotation process as it pertains to the finger loop 550 and the housing 502.
- the slide key 600 has been removed from the release trigger 602.
- the finger loop 550 is shown approximately midway between the pistol configuration and the scissor configuration. For illustration purposes only, it will be assumed that the finger loop 550 is being moved from the pistol configuration to the scissor configuration. However, it will be understood that the figure also illustrates the reverse process.
- the depression region 606 has been depressed against coil spring 626 such that the release trigger 602 is rotated into the open or release position.
- the trigger key 612 has come out of engagement with the pistol configuration notch 620 on the housing disk 627 as well as the notch 618 on the finger disk 624.
- the trigger key 612 rides along the outer surface of the housing disk 627. Thus, pressure need not be maintained on the depression region 606 of the release trigger 602 to maintain it in the release position.
- the finger loop notch 618 and the trigger key 612 approach the scissor configuration notch 632 on the housing disk 627.
- the trigger key 612 is allowed to fall into engagement with both notches, thus fixing the finger loop 550 and the housing 502 in the scissor configuration.
- the release trigger 602 is depressed to release the finger disk from the housing disk.
- the finger loop 550 is then rotated toward the pistol configuration.
- the trigger key 612 rides on the circumference of the housing disk 627. When the notch 618 lines up with pistol configuration notch 620 on the housing disk 627, the trigger key 612 falls into the notches, locking the finger loop 550 and the housing 502 in the pistol configuration.
- Figures 28a and 28b depict the handle assembly 500 in the scissor configuration.
- the finger loop 550 and thumb loop 552 have been rotated to new positions relative to the housing 502 and drive cog 504.
- the tab 556 on the drive cog 504 remains in a substantially vertical orientation such that it protrudes into the port 517.
- the release trigger 602 is shown in the closed position such that the handle 500 is locked in the scissor configuration.
- Slide key 610 is shown aligned with trigger key 612 and pivot 604 is shown at the end of slot 650 in the slide member 600.
- the trigger key 612 engages finger notch 618 and the scissor configuration notch 632 on the housing disk 627.
- Slide key 610 engages thumb notch 616 and the scissor configuration notch 630 in the drive cog 504.
- the pistol configuration notches 614 in the drive cog and 620 in the housing 502 are not engaged by either of the keys.
- actuation of a tool assembly is performed in the same manner as in the pistol configuration.
- Thumb loop 552 is rotated with respect to finger loop 550.
- the finger loop 550 is held stationary with respect to the housing 502 by trigger key 612.
- the drive cog 504 is carried with it because the slide key 610 locks the drive cog 504 to the thumb disk 622.
- the tab 556 translates within the port 517 to actuate a tool assembly.
- Figure 28b is a schematic view taken along line A-A of Figure 28a.
- the housing 502 comprises housing disk 627.
- the finger disk 624 is on top of the housing disk 627, and the thumb disk 622 is on top of the finger disk 624.
- the drive cog 504 is on top of the thumb disk 622.
- the torsion spring 555 is shown exploded out of the figure for clarity.
- Each of the disks and the drive cog 504 has a different diameter. Specifically, in this embodiment, the disks decrease in diameter in the direction away from the housing 502. The differing diameters work in conjunction with the surfaces of the keys 610 and 612 to control the process of rotation between the pistol configuration and the scissor configuration. The sequence in which the keys drop into engagement with the notches on the disk is controlled to ensure that the rotation process is properly carried out. This sequencing will be described below in detail.
- Figure 28b also shows the release trigger 602 mounted on pivot 604.
- the depression end 606 and the key end 608 are on opposite sides of the pivot 604.
- Slide member 600 is also shown.
- a guard 674 is an integral part of the finger loop 550. It prevents foreign objects from interfering with the mechanism of the trigger 602, slide member 600, and notches.
- Figure 29 is a schematic elevational view of the housing 502 of the handle assembly 500.
- the housing 502 includes half of the tool assembly port 517 and the integral housing disk 627.
- Pivot hole 652 passes through the housing at approximately the center of the housing disk 627.
- the housing disk 627 comprises a pistol configuration notch 620 and a scissor configuration notch 632 both of which are engageable by the trigger key 612 to lock the housing disk 627 to the finger disk 624.
- Figure 30 is a schematic elevational view of the finger loop 550 of the handle assembly 500 of the present invention.
- the finger loop 550 comprises finger disk 624 and guard 674.
- Pivot hole 654 passes through the finger loop 550 approximately at the center of the finger disk 624.
- the finger disk 624 comprises finger notch 618 engageable by the trigger key 612 to lock the finger disk 624 to the housing disk 627 in either the pistol or the scissor configuration.
- the finger loop 550 also comprises a pivot hole 676. The pivot 604 passes through this hole 676 to mount the release trigger 602 to the finger loop 550.
- Figure 31 is a schematic elevational view of the thumb loop 552 of the handle assembly 500 of the present invention.
- the thumb loop 552 comprises a thumb disk 622 having a pivot hole 656 approximately at its center and the thumb notch 616 on its circumference.
- the thumb notch 616 is engageable by the slide key 610 to lock the thumb disk 622 to the drive cog 504.
- Figure 32a is a schematic elevational view of the drive cog 504 and the torsion spring 555 of the handle assembly 500 of the present invention.
- Figure 32b is a side view of the drive cog 504.
- the drive cog 504 comprises a pivot hole 658 located approximately through its center.
- the torsion spring 555 rests in a recessed portion 678 of the drive cog 504.
- the end 666 of the torsion spring is inserted in hole 664.
- the end 668 of the torsion spring 555 rests in a hole in the top cover 503 (not shown).
- Tabs 556 and 558 are formed on the circumference of the drive cog 504. Tab 556 engages a tool assembly to actuate it. Tab 558 engages a tool assembly during installation to ensure proper installation.
- the pistol configuration notch 614 and the scissor configuration notch 632 are also formed on the circumference of the drive cog 504. These notches are engageable by the slide key 610 to lock the thumb disk 622 to the drive cog 504 in either the pistol configuration or the scissor configuration.
- Figures 33a and 33b are schematic elevational views of the release trigger 602 of the handle assembly 500 of the present invention rotated 90° from each other.
- the release trigger 602 comprises a pivot hole 678 through which pivot 604 passes to mount the release trigger 602 to the finger loop 550.
- the release trigger 602 also comprises a depression end 606 and a key end 608.
- the trigger key 612 is located at the key end 608 of the release trigger 602.
- the release trigger 602 also comprises a slide rail 646.
- the slide rail 646 mates with the slide groove 648 on the slide member 600.
- Figure 34 is a schematic elevational view of the slide member 600 of the handle assembly 500 of the present invention.
- the slide member 600 comprises the slide groove 648 which mates with the slide rail 646 of the release trigger 602.
- the pivot 604 passes through slot 650 in the slide member 600 to control the extent of travel of the slide member 600.
- the slide key 610 of the slide member 600 comprises a step 680 (see Figures 35a and 35b also).
- the step 680 is used in controlling the sequencing and depth of engagement of the keys 610 and 612 with the grooves in the disks and drive cog 504. This will be described below in detail.
- FIGS 35a and 35b are schematic perspective views of the release trigger 602 and slide member 600 of the handle assembly 500 of the present invention. The figures represent the sliding action of the slide member 600 with respect to the release trigger 602.
- the slide member 600 slides back and forth along the release trigger 602 as indicated by the arrow 682.
- Figure 35a shows the slide member 600 at the top of the release trigger 602.
- the slide key 610 and the trigger key 612 are substantially aligned.
- the release trigger 602 and slide member 600 are in this position in an assembled surgical instrument having the handle assembly 500, the thumb loop 552 and the finger loop 550 have been rotated toward each other. Consequently, the tab 556 on the drive cog 504 has been translated back within the port 517, and the tool assembly 12 is in the closed position.
- Figure 35b shows the slide member 600 at the bottom of the release trigger 602.
- the slide member 600 is guided by slide rail 646 on the release trigger 602 and slide groove 648 on the slide member 600.
- the slot 650 in the slide member 600 and the pivot 604 limit the travel distance of the slide member 600.
- Figures 36a-f and 37a-f illustrate the steps in the process of rotation from the pistol configuration to the scissor configuration.
- Figures 36a-f are schematic elevational views of the housing disk 627, finger disk 624, thumb disk 622, drive cog 504, release trigger 602 and slide member 600 in various stages of the rotation process.
- Each of Figures 37a-f is a schematic cross-sectional view taken along a cut line shown in one of Figures 36a-f.
- Each of Figures 36a-f corresponds to one of Figures 37a-f.
- guard 674 is shown in Figures 36a-f but has been omitted from Figures 37a-f for purposes of clarity.
- Figures 36a and 37a show the handle 500 locked in the pistol configuration before the rotation process begins.
- the release trigger 602 is in the closed position, and the finger loop 552 and thumb loop 550 are rotated toward each other to the tool-assembly-closed position.
- four disk notches namely, the pistol configuration housing notch 620, the finger notch 618, the thumb notch 616, and the pistol configuration drive cog notch 614 are aligned.
- the slide member 600 is at the top of the release trigger 602 such that the trigger key 612 and the slide key 610 are aligned.
- the trigger key 612 is in engagement with the pistol configuration housing disk notch 620 and the finger disk notch 618. Therefore, the two disks are rotationally fixed to each other.
- the slide key 610 engages the thumb disk notch 616 and the pistol configuration drive cog notch 614 to rotationally fix the thumb loop 552 to the drive cog 504.
- Figures 36b and 37b illustrate a first step in the rotation process.
- the depression region 606 of the trigger 602 has been depressed to rotate the release trigger 602 such that keys 610 and 612 no longer engage notches 614, 616, 618, 620.
- the finger loop 550 and thumb loop 552 have been rotated slightly in the clockwise direction relative to the housing disk 627 and the drive cog 504. Therefore, notches 614 and 620 are no longer aligned with notches 616 and 618. It should be noted that the finger loop 550 and the thumb loop 552 may be held together in the tool-assembly-closed position by the user during the rotation process as shown in the figures.
- the trigger key 612 rides on the outer diameter of the housing disk 627 as the finger loop 550 is rotated. Because of the difference in diameters among the other disks and the drive cog 504, the trigger key 612 and slide key 610 do not contact the other disks.
- the trigger key 612 has dropped into partial engagement with the housing disk notch 632 and the finger disk notch 618. This partial engagement is sufficient to lock the finger loop 550 to the housing 502 in the scissor configuration and prevent further rotation. Since the thumb notch 616 and drive cog notch 630 are not also aligned, the slide key 610 rests on the outer surface of the thumb disk 622. Because the slide member 600 is coupled to the release trigger 602 via the slide rail 646 and slide groove 648, the slide key 610 prevents the trigger key 612 from falling completely into engagement with the notches 618 and 632.
- the thumb loop 550 was rotated back and forth to align the slide key 610 with the notch 616.
- the slide member 600 slid along the release trigger 602 to facilitate the alignment.
- Figures 36d and 37d show the slide member 600 no longer at the top of the release trigger 602. It has translated an amount required for the slide key 610 to line up with the thumb notch 616.
- the step 680 in the slide key 610 rides on the outer surface of the drive cog 504. The step 680 allows the slide key to fall far enough into the thumb notch 616 such that it will not be able to inadvertently disengage the notch 616 during subsequent alignment of the slide key 610 with the notch 630 on the drive cog 504.
- Figures 36e and 37e show the final step of the rotation process.
- the thumb loop 552 has been rotated back and forth until the slide key 610 was dragged into alignment with the scissor configuration notch 630 in the drive cog 504.
- the slide key 610 has fallen into complete engagement with notches 618 and 630. Since it is no longer inhibited by the slide key 610, the trigger key 612 has dropped into complete engagement with notches 618 and 632.
- the release trigger 602 has rotated completely into the closed position.
- Figures 36f and 37f illustrate the tool actuation function in the scissor configuration.
- the thumb loop 550 is rotated with respect to the finger loop 552. Because the slide key 610 couples the thumb disk 622 to the drive cog 504, the drive cog 504 also rotates.
- the slide member 600 slides along the release trigger 602. During tool actuation, the trigger key 612 remains stationary within the finger notch 618 and the scissor configuration housing notch 630. Therefore, the scissor configuration is maintained.
Abstract
Description
characterized in that
Claims (24)
- A surgical instrument (10) comprising:a tool assembly (12) comprising:jaws (70, 72) pivotable relative to each other;a sleeve (18);an extension (16) within the sleeve, the extension and the sleeve being coupled to the jaws and being longitudinally translatable relative to each other to pivot the jaws toward open and closed positions; anda handle assembly (14) comprising:a base (50) having a port (17) in which the tool assembly is retainable; andan actuation trigger member (52) pivotably mounted to the base comprising:a tab (56) protruding into the port for engaging the tool assembly to translate the extension and the sleeve relative to each other upon rotation of the actuation trigger member;a shoulder protruding into the port during insertion of the tool assembly for engaging the tool assembly as it is inserted into the port to provide rotational movement to the actuation trigger to rotate the tab into engagement with the tool assembly; characterized in that:the tool assembly further comprises a rotator (42) coupled to the sleeve for rotating the tool assembly to a desired position; andthe handle assembly further comprises a spring-biased retaining member (60) for receiving an end of the tool assembly as it is inserted into the port and engaging the tool assembly to retain the tool assembly in the port as it is inserted.
- The surgical instrument of Claim 1 wherein the sleeve is retained against longitudinal movement and the extension is translated to pivot the jaws.
- The surgical instrument of Claims 1 or 2 wherein the jaws comprise open-ended slots (82, 84) engageable by the extension to pivot the jaws.
- The surgical instrument of Claim 3 wherein the extension is translatable out of engagement with the open-ended slots such that the jaws are detachable from the sleeve and replaceable on the sleeve.
- The surgical instrument of any preceding claim wherein the distal end of the sleeve comprises an elastic material such that the distal end of the sleeve is spreadable to allow the jaws to be removed from the sleeve and replaced on the sleeve.
- The surgical instrument of any preceding claim wherein the tool assembly further comprises a compressible pivot (701) for removably mounting the jaws to the distal end of the sleeve.
- The surgical instrument of any preceding claim wherein the jaws are removable from the tool assembly and replaceable on the tool assembly.
- The surgical instrument of any preceding claim wherein the tool assembly further comprises a cleaning port (40) for allowing a cleaning fluid to be introduced into the tool assembly.
- The surgical instrument of any preceding claim further comprising:a pivot pin (68) coupled to the distal end of the sleeve for mounting the jaws; anda drive pin (86) coupled to the extension, said drive pin being engageable with open-ended slots in the jaws to pivot the jaws.
- The surgical instrument of any preceding claim wherein the rotator (42) rotates the tool assembly about a longitudinal axis of the tool assembly.
- The surgical instrument of any preceding claim further comprising means for providing an electrical connection (48) to the tool assembly.
- The surgical instrument of any preceding claim wherein the base of the handle comprises a second port (1018, 1019) in which the tool assembly is retainable, relative translation between the extension and the sleeve being providable by the actuation trigger member as the tool assembly is retained in either port.
- The surgical instrument of any preceding claim wherein the port is rotatable relative to the base such that the relative orientation between the longitudinal axis of the tool assembly and the base of the handle is changeable.
- The surgical instrument of Claim 13 wherein the base of the handle assembly further comprises a finger member (550) pivotably mounted to the base, said finger member being releasably fixable in one of a first rotational orientation and a second rotational orientation relative to the port, the actuation trigger member being pivotable relative to the finger member to actuate the tool assembly.
- A surgical tool assembly (12) for attachment to a handle assembly (14) comprising:a sleeve (18);an extension (16) within the sleeve and longitudinally translatable relative to the sleeve; andjaws (70, 72) pivotable relative to each other, the jaws being pivotably mounted by a pivot (68) to a distal end of the sleeve;each jaw having a slot (82, 84) at a proximal end of the jaw, sides of each slot being defined by inner walls (87, 88, 90, 92) of the slot, engagement of the extension with the inner walls of the slots as the extension is translated relative to the sleeve serving to open and close the jaws;
characterized in that the slots are open-ended, the extension being translatable in and out of the open-ended slots to permit engagement and disengagement of the extension. - The tool assembly of Claim 15 wherein the pivot is compressible such that the jaws are removable from the sleeve.
- The tool assembly of one of Claims 15-16 wherein the extension is translatable out of the open-ended slots in the jaws such that the jaws are removable from the sleeve and replaceable on the sleeve.
- The tool assembly of one of Claims 15-17 wherein:the extension is translatable out of the open-ended slots in the jaws; andthe distal end of the sleeve comprises an elastic material such that the distal end of the sleeve is spreadable to allow the jaws to be removed from the sleeve and replaced on the sleeve.
- The tool assembly of one of Claims 15-18 further comprising:a pivot pin (68) coupled to the distal end of the sleeve for mounting the jaws; anda drive pin (86) coupled to the extension, said drive pin being engageable with the inner walls of the open-ended slots in the jaws to pivot the jaws.
- A handle assembly for removable attachment to an elongate surgical tool assembly (12) which extends along a longitudinal axis, the handle assembly comprising:a base (502) having a longitudinal port (517) in which the tool assembly is retainable; anda finger member (550) and a thumb member (552) mounted to the base, one of the finger member and thumb member being held stationary relative to the base at an angular orientation relative to the longitudinal axis of the tool assembly while the other of the finger member and thumb member is rotated relative to the base about a pivot (554) to provide translation motion to the tool assembly within the port to actuate the tool assembly; anda retainer (560) coupled into the port to engage the tool assembly to retain the tool assembly at its proximal end within the port; characterized in thatthe handle assembly further comprises:means for changing the angular orientation between the longitudinal axis of the tool assembly and the one of the finger member and thumb member.
- The handle assembly of Claim 20 wherein the base comprises a second longitudinal port (1019) for retaining the tool assembly, relative rotation between the finger member and thumb member actuating the tool assembly as it is retained in one of the ports.
- The handle assembly of one of Claims 20-21 further comprising a releasable second retainer (627) at which the one of the finger member and thumb member is pivotably mounted to the base, the second retainer being releasable to allow the one of the finger member and thumb member to be rotated relative to the base.
- The handle assembly of one of Claims 20-22 wherein the thumb and finger members comprise rigid loops rotatable with respect to the base between a first releasably fixed position and a second releasably fixed position.
- The handle assembly of one of Claims 20-23 wherein:the finger member is pivotably mounted to the base and is releasably fixable in one of a plurality of angular orientations relative to the base; andthe thumb member is pivotable relative to the finger member to actuate the tool assembly as the finger member is fixed in a releasably fixed angular orientation relative to the base.
Applications Claiming Priority (5)
| Application Number | Priority Date | Filing Date | Title |
|---|---|---|---|
| US90316292A | 1992-06-24 | 1992-06-24 | |
| US903162 | 1992-06-24 | ||
| US479093A | 1993-01-14 | 1993-01-14 | |
| US4790 | 1993-01-14 | ||
| PCT/US1993/006024 WO1994000059A1 (en) | 1992-06-24 | 1993-06-23 | Reusable endoscopic surgical instrument |
Publications (2)
| Publication Number | Publication Date |
|---|---|
| EP0647122A1 EP0647122A1 (en) | 1995-04-12 |
| EP0647122B1 true EP0647122B1 (en) | 1998-02-04 |
Family
ID=26673474
Family Applications (1)
| Application Number | Title | Priority Date | Filing Date |
|---|---|---|---|
| EP93916724A Expired - Lifetime EP0647122B1 (en) | 1992-06-24 | 1993-06-23 | Reusable endoscopic surgical instrument |
Country Status (7)
| Country | Link |
|---|---|
| US (2) | US5499992A (en) |
| EP (1) | EP0647122B1 (en) |
| JP (2) | JP3518603B2 (en) |
| AU (1) | AU4648693A (en) |
| DE (1) | DE69316894T2 (en) |
| ES (1) | ES2115068T3 (en) |
| WO (1) | WO1994000059A1 (en) |
Families Citing this family (289)
| Publication number | Priority date | Publication date | Assignee | Title |
|---|---|---|---|---|
| ES2115068T3 (en) * | 1992-06-24 | 1998-06-16 | Microsurge Inc | REUSABLE ENDOSCOPIC SURGICAL INSTRUMENT. |
| US5556416A (en) * | 1993-10-12 | 1996-09-17 | Valleylab, Inc. | Endoscopic instrument |
| DE69532486T2 (en) * | 1994-03-17 | 2004-12-23 | Terumo K.K. | Surgical instrument |
| FR2724307B1 (en) * | 1994-09-12 | 1997-01-03 | Mikroland | MODULAR SURGICAL INSTRUMENT, ESPECIALLY FOR COELIOSCOPIC SURGERY |
| CA2159685C (en) * | 1994-10-07 | 2007-07-31 | Scott W. Larsen | Endoscopic surgical instruments useful for spinal procedures |
| DE4444403A1 (en) * | 1994-12-14 | 1996-06-20 | Waizenegger Klaus | Surgical instrument |
| US5575799A (en) * | 1995-03-30 | 1996-11-19 | United States Surgical Corporation | Articulating surgical apparatus |
| US5879365A (en) * | 1995-04-04 | 1999-03-09 | United States Surgical Corporation | Surgical cutting apparatus |
| JP3989030B2 (en) * | 1995-04-06 | 2007-10-10 | オリンパス株式会社 | Ultrasonic incision coagulator |
| FR2735350B1 (en) * | 1995-06-15 | 1997-12-26 | Maurice Lanzoni | DEVICE FOR DEVELOPING EFFORTS OF A CUTTER |
| DE19534618A1 (en) * | 1995-09-18 | 1997-03-20 | Karl Schad | Surgical instrument |
| US5810805A (en) * | 1996-02-09 | 1998-09-22 | Conmed Corporation | Bipolar surgical devices and surgical methods |
| US5817062A (en) * | 1996-03-12 | 1998-10-06 | Heartport, Inc. | Trocar |
| US5626608A (en) * | 1996-03-29 | 1997-05-06 | United States Surgical Corporation | Surgical instrument having locking handle |
| US5893874A (en) * | 1997-02-07 | 1999-04-13 | Smith & Nephew, Inc. | Surgical instrument |
| US5964756A (en) * | 1997-04-11 | 1999-10-12 | Vidamed, Inc. | Transurethral needle ablation device with replaceable stylet cartridge |
| US5849021A (en) * | 1997-04-18 | 1998-12-15 | Tnco, Inc. | Elongated thumb loop for surgical instrument |
| ATE260606T1 (en) * | 1997-06-02 | 2004-03-15 | Cook Urological Inc | INTERCHANGEABLE HAND PIECE FOR A MEDICAL DEVICE |
| JP4229491B2 (en) * | 1997-07-16 | 2009-02-25 | オリンパス株式会社 | Surgical instrument |
| US5954736A (en) * | 1997-10-10 | 1999-09-21 | Ethicon Endo-Surgery, Inc. | Coagulator apparatus having indexed rotational positioning |
| US5980510A (en) * | 1997-10-10 | 1999-11-09 | Ethicon Endo-Surgery, Inc. | Ultrasonic clamp coagulator apparatus having improved clamp arm pivot mount |
| DE19747043C2 (en) * | 1997-10-24 | 2000-01-27 | Wolf Gmbh Richard | Endoscopic instrument |
| US7364577B2 (en) | 2002-02-11 | 2008-04-29 | Sherwood Services Ag | Vessel sealing system |
| US6626929B1 (en) * | 1999-04-15 | 2003-09-30 | Classic Wire Cut | Surgical instrument with locking ratchet apparatus and method |
| DE19945228C1 (en) * | 1999-09-21 | 2001-06-07 | Storz Karl Gmbh & Co Kg | Medical instrument |
| US7235073B2 (en) | 2000-07-06 | 2007-06-26 | Ethicon Endo-Surgery, Inc. | Cooled electrosurgical forceps |
| US20030229344A1 (en) * | 2002-01-22 | 2003-12-11 | Dycus Sean T. | Vessel sealer and divider and method of manufacturing same |
| US10835307B2 (en) | 2001-06-12 | 2020-11-17 | Ethicon Llc | Modular battery powered handheld surgical instrument containing elongated multi-layered shaft |
| WO2003013374A1 (en) * | 2001-08-06 | 2003-02-20 | Penn State Research Foundation | Multifunctional tool and method for minimally invasive surgery |
| US7901398B2 (en) | 2001-12-19 | 2011-03-08 | George Stanczak | Failsafe reconfigurable surgical apparatus |
| US7799026B2 (en) | 2002-11-14 | 2010-09-21 | Covidien Ag | Compressible jaw configuration with bipolar RF output electrodes for soft tissue fusion |
| US7837631B2 (en) * | 2003-03-14 | 2010-11-23 | Boston Scientific Scimed Inc. | Biopsy forceps with removable jaw segments |
| US7025775B2 (en) * | 2003-05-15 | 2006-04-11 | Applied Medical Resources Corporation | Surgical instrument with removable shaft apparatus and method |
| US8114107B2 (en) * | 2003-11-05 | 2012-02-14 | Applied Medical Resources Corporation | Laparoscopic scissor blades |
| US9848938B2 (en) | 2003-11-13 | 2017-12-26 | Covidien Ag | Compressible jaw configuration with bipolar RF output electrodes for soft tissue fusion |
| US7367976B2 (en) | 2003-11-17 | 2008-05-06 | Sherwood Services Ag | Bipolar forceps having monopolar extension |
| US8182501B2 (en) | 2004-02-27 | 2012-05-22 | Ethicon Endo-Surgery, Inc. | Ultrasonic surgical shears and method for sealing a blood vessel using same |
| AU2005295010B2 (en) | 2004-10-08 | 2012-05-31 | Ethicon Endo-Surgery, Inc. | Ultrasonic surgical instrument |
| CA2593552A1 (en) * | 2005-01-19 | 2006-07-27 | Applied Medical Resources Corporation | Disposable laparoscopic instrument |
| US20060235382A1 (en) * | 2005-04-19 | 2006-10-19 | Yoram Cohen | Instrument guard and reusable medical device employing same |
| US20070191713A1 (en) | 2005-10-14 | 2007-08-16 | Eichmann Stephen E | Ultrasonic device for cutting and coagulating |
| US7621930B2 (en) | 2006-01-20 | 2009-11-24 | Ethicon Endo-Surgery, Inc. | Ultrasound medical instrument having a medical ultrasonic blade |
| WO2008005433A1 (en) * | 2006-06-30 | 2008-01-10 | Bovie Medical | Surgical instrument with detachable tool assembly |
| US20080021278A1 (en) * | 2006-07-24 | 2008-01-24 | Leonard Robert F | Surgical device with removable end effector |
| US7708758B2 (en) * | 2006-08-16 | 2010-05-04 | Cambridge Endoscopic Devices, Inc. | Surgical instrument |
| CA2662602C (en) * | 2006-09-11 | 2011-12-06 | Karl Storz Endovision, Inc. | System and method for an hysteroscope with integrated instruments |
| JP5198014B2 (en) * | 2006-10-25 | 2013-05-15 | テルモ株式会社 | Medical manipulator |
| EP2109405A1 (en) * | 2007-02-08 | 2009-10-21 | Bovie Medical | Modular electrosurgical adaptors and multi function active shafts for use in electrosurgigal instruments |
| US7655004B2 (en) | 2007-02-15 | 2010-02-02 | Ethicon Endo-Surgery, Inc. | Electroporation ablation apparatus, system, and method |
| US20080200933A1 (en) * | 2007-02-15 | 2008-08-21 | Bakos Gregory J | Surgical devices and methods for forming an anastomosis between organs by gaining access thereto through a natural orifice in the body |
| US20080200911A1 (en) * | 2007-02-15 | 2008-08-21 | Long Gary L | Electrical ablation apparatus, system, and method |
| US20080200934A1 (en) * | 2007-02-15 | 2008-08-21 | Fox William D | Surgical devices and methods using magnetic force to form an anastomosis |
| US20080200762A1 (en) * | 2007-02-16 | 2008-08-21 | Stokes Michael J | Flexible endoscope shapelock |
| US7815662B2 (en) * | 2007-03-08 | 2010-10-19 | Ethicon Endo-Surgery, Inc. | Surgical suture anchors and deployment device |
| US8911460B2 (en) | 2007-03-22 | 2014-12-16 | Ethicon Endo-Surgery, Inc. | Ultrasonic surgical instruments |
| US8142461B2 (en) | 2007-03-22 | 2012-03-27 | Ethicon Endo-Surgery, Inc. | Surgical instruments |
| US8057498B2 (en) | 2007-11-30 | 2011-11-15 | Ethicon Endo-Surgery, Inc. | Ultrasonic surgical instrument blades |
| US8075572B2 (en) * | 2007-04-26 | 2011-12-13 | Ethicon Endo-Surgery, Inc. | Surgical suturing apparatus |
| US8100922B2 (en) | 2007-04-27 | 2012-01-24 | Ethicon Endo-Surgery, Inc. | Curved needle suturing tool |
| US8523889B2 (en) | 2007-07-27 | 2013-09-03 | Ethicon Endo-Surgery, Inc. | Ultrasonic end effectors with increased active length |
| US8808319B2 (en) | 2007-07-27 | 2014-08-19 | Ethicon Endo-Surgery, Inc. | Surgical instruments |
| US8430898B2 (en) | 2007-07-31 | 2013-04-30 | Ethicon Endo-Surgery, Inc. | Ultrasonic surgical instruments |
| US8512365B2 (en) | 2007-07-31 | 2013-08-20 | Ethicon Endo-Surgery, Inc. | Surgical instruments |
| US9044261B2 (en) | 2007-07-31 | 2015-06-02 | Ethicon Endo-Surgery, Inc. | Temperature controlled ultrasonic surgical instruments |
| US8262655B2 (en) | 2007-11-21 | 2012-09-11 | Ethicon Endo-Surgery, Inc. | Bipolar forceps |
| US8579897B2 (en) | 2007-11-21 | 2013-11-12 | Ethicon Endo-Surgery, Inc. | Bipolar forceps |
| US8568410B2 (en) | 2007-08-31 | 2013-10-29 | Ethicon Endo-Surgery, Inc. | Electrical ablation surgical instruments |
| US8623027B2 (en) | 2007-10-05 | 2014-01-07 | Ethicon Endo-Surgery, Inc. | Ergonomic surgical instruments |
| US8480657B2 (en) | 2007-10-31 | 2013-07-09 | Ethicon Endo-Surgery, Inc. | Detachable distal overtube section and methods for forming a sealable opening in the wall of an organ |
| US20090112059A1 (en) | 2007-10-31 | 2009-04-30 | Nobis Rudolph H | Apparatus and methods for closing a gastrotomy |
| US10010339B2 (en) | 2007-11-30 | 2018-07-03 | Ethicon Llc | Ultrasonic surgical blades |
| US8623276B2 (en) | 2008-02-15 | 2014-01-07 | Covidien Lp | Method and system for sterilizing an electrosurgical instrument |
| US8262680B2 (en) | 2008-03-10 | 2012-09-11 | Ethicon Endo-Surgery, Inc. | Anastomotic device |
| EP2319447B1 (en) | 2008-03-31 | 2012-08-22 | Applied Medical Resources Corporation | Electrosurgical tool with jaws actuatable by a force regulation mechanism |
| US8277475B2 (en) | 2008-05-09 | 2012-10-02 | Applied Medical Resources Corporation | Laparoscopic scissors |
| US20090287235A1 (en) * | 2008-05-14 | 2009-11-19 | Richard Fortier | Cutting Assembly For Use In A Laparoscopic Cutting Instrument |
| US8679003B2 (en) | 2008-05-30 | 2014-03-25 | Ethicon Endo-Surgery, Inc. | Surgical device and endoscope including same |
| US8317806B2 (en) | 2008-05-30 | 2012-11-27 | Ethicon Endo-Surgery, Inc. | Endoscopic suturing tension controlling and indication devices |
| US8070759B2 (en) | 2008-05-30 | 2011-12-06 | Ethicon Endo-Surgery, Inc. | Surgical fastening device |
| US8652150B2 (en) * | 2008-05-30 | 2014-02-18 | Ethicon Endo-Surgery, Inc. | Multifunction surgical device |
| US8114072B2 (en) | 2008-05-30 | 2012-02-14 | Ethicon Endo-Surgery, Inc. | Electrical ablation device |
| US8771260B2 (en) | 2008-05-30 | 2014-07-08 | Ethicon Endo-Surgery, Inc. | Actuating and articulating surgical device |
| US8906035B2 (en) | 2008-06-04 | 2014-12-09 | Ethicon Endo-Surgery, Inc. | Endoscopic drop off bag |
| US8403926B2 (en) | 2008-06-05 | 2013-03-26 | Ethicon Endo-Surgery, Inc. | Manually articulating devices |
| US8361112B2 (en) | 2008-06-27 | 2013-01-29 | Ethicon Endo-Surgery, Inc. | Surgical suture arrangement |
| US8888792B2 (en) | 2008-07-14 | 2014-11-18 | Ethicon Endo-Surgery, Inc. | Tissue apposition clip application devices and methods |
| US8262563B2 (en) | 2008-07-14 | 2012-09-11 | Ethicon Endo-Surgery, Inc. | Endoscopic translumenal articulatable steerable overtube |
| US9089360B2 (en) | 2008-08-06 | 2015-07-28 | Ethicon Endo-Surgery, Inc. | Devices and techniques for cutting and coagulating tissue |
| US8211125B2 (en) | 2008-08-15 | 2012-07-03 | Ethicon Endo-Surgery, Inc. | Sterile appliance delivery device for endoscopic procedures |
| US8529563B2 (en) | 2008-08-25 | 2013-09-10 | Ethicon Endo-Surgery, Inc. | Electrical ablation devices |
| US8241204B2 (en) | 2008-08-29 | 2012-08-14 | Ethicon Endo-Surgery, Inc. | Articulating end cap |
| US8480689B2 (en) | 2008-09-02 | 2013-07-09 | Ethicon Endo-Surgery, Inc. | Suturing device |
| US8409200B2 (en) | 2008-09-03 | 2013-04-02 | Ethicon Endo-Surgery, Inc. | Surgical grasping device |
| US8114119B2 (en) | 2008-09-09 | 2012-02-14 | Ethicon Endo-Surgery, Inc. | Surgical grasping device |
| US8337394B2 (en) * | 2008-10-01 | 2012-12-25 | Ethicon Endo-Surgery, Inc. | Overtube with expandable tip |
| US8016827B2 (en) | 2008-10-09 | 2011-09-13 | Tyco Healthcare Group Lp | Apparatus, system, and method for performing an electrosurgical procedure |
| DE102008058207A1 (en) * | 2008-11-19 | 2010-05-20 | Dannoritzer Medizintechnik Gmbh & Co. Kg | Handle device |
| US8157834B2 (en) | 2008-11-25 | 2012-04-17 | Ethicon Endo-Surgery, Inc. | Rotational coupling device for surgical instrument with flexible actuators |
| US7628798B1 (en) * | 2008-11-25 | 2009-12-08 | Microaire Surgical Instruments, Inc. | Hub and handle design for carpal tunnel release tool |
| US8172772B2 (en) | 2008-12-11 | 2012-05-08 | Ethicon Endo-Surgery, Inc. | Specimen retrieval device |
| US8361066B2 (en) | 2009-01-12 | 2013-01-29 | Ethicon Endo-Surgery, Inc. | Electrical ablation devices |
| US8828031B2 (en) | 2009-01-12 | 2014-09-09 | Ethicon Endo-Surgery, Inc. | Apparatus for forming an anastomosis |
| US8114122B2 (en) | 2009-01-13 | 2012-02-14 | Tyco Healthcare Group Lp | Apparatus, system, and method for performing an electrosurgical procedure |
| US8252057B2 (en) | 2009-01-30 | 2012-08-28 | Ethicon Endo-Surgery, Inc. | Surgical access device |
| US9226772B2 (en) | 2009-01-30 | 2016-01-05 | Ethicon Endo-Surgery, Inc. | Surgical device |
| US8037591B2 (en) | 2009-02-02 | 2011-10-18 | Ethicon Endo-Surgery, Inc. | Surgical scissors |
| JP5400444B2 (en) * | 2009-03-27 | 2014-01-29 | テルモ株式会社 | Method for manufacturing medical device and medical device |
| US8187273B2 (en) | 2009-05-07 | 2012-05-29 | Tyco Healthcare Group Lp | Apparatus, system, and method for performing an electrosurgical procedure |
| US9700339B2 (en) | 2009-05-20 | 2017-07-11 | Ethicon Endo-Surgery, Inc. | Coupling arrangements and methods for attaching tools to ultrasonic surgical instruments |
| US9277932B2 (en) * | 2009-05-22 | 2016-03-08 | Slatr Surgical Holdings Llc | Endoscopic scissors instrument with friction enhancing tissue stops |
| US8690909B2 (en) * | 2009-05-22 | 2014-04-08 | Charles R. Slater | Endoscopic instrument with bi-laterally widened cam-slot at end effector |
| US20100298854A1 (en) * | 2009-05-22 | 2010-11-25 | Slater Charles R | Endoscopic Instrument with Control Member Having Decreasing Torsional and Flexural Stiffness Along Its Length |
| US9566082B2 (en) | 2009-05-22 | 2017-02-14 | Slatr Surgical Holdings Llc | Endoscopic instrument |
| US20100298853A1 (en) * | 2009-05-22 | 2010-11-25 | Slater Charles R | Endoscopic Instrument Having Rotatably Mounted End Effector Assembly |
| US8663220B2 (en) | 2009-07-15 | 2014-03-04 | Ethicon Endo-Surgery, Inc. | Ultrasonic surgical instruments |
| WO2011024200A1 (en) * | 2009-08-31 | 2011-03-03 | Indian Institute Of Science | Laparoscopic apparatus |
| US8133254B2 (en) | 2009-09-18 | 2012-03-13 | Tyco Healthcare Group Lp | In vivo attachable and detachable end effector assembly and laparoscopic surgical instrument and methods therefor |
| US8112871B2 (en) | 2009-09-28 | 2012-02-14 | Tyco Healthcare Group Lp | Method for manufacturing electrosurgical seal plates |
| USRE47996E1 (en) | 2009-10-09 | 2020-05-19 | Ethicon Llc | Surgical generator for ultrasonic and electrosurgical devices |
| US20110087254A1 (en) * | 2009-10-09 | 2011-04-14 | Cardiovascular Systems, Inc. | Rotational atherectomy device with keyed exchangeable drive shaft |
| US11090104B2 (en) | 2009-10-09 | 2021-08-17 | Cilag Gmbh International | Surgical generator for ultrasonic and electrosurgical devices |
| US10441345B2 (en) | 2009-10-09 | 2019-10-15 | Ethicon Llc | Surgical generator for ultrasonic and electrosurgical devices |
| US8951248B2 (en) | 2009-10-09 | 2015-02-10 | Ethicon Endo-Surgery, Inc. | Surgical generator for ultrasonic and electrosurgical devices |
| US20110098704A1 (en) | 2009-10-28 | 2011-04-28 | Ethicon Endo-Surgery, Inc. | Electrical ablation devices |
| US8608652B2 (en) | 2009-11-05 | 2013-12-17 | Ethicon Endo-Surgery, Inc. | Vaginal entry surgical devices, kit, system, and method |
| US8353487B2 (en) | 2009-12-17 | 2013-01-15 | Ethicon Endo-Surgery, Inc. | User interface support devices for endoscopic surgical instruments |
| US8496574B2 (en) | 2009-12-17 | 2013-07-30 | Ethicon Endo-Surgery, Inc. | Selectively positionable camera for surgical guide tube assembly |
| US8506564B2 (en) | 2009-12-18 | 2013-08-13 | Ethicon Endo-Surgery, Inc. | Surgical instrument comprising an electrode |
| US9028483B2 (en) | 2009-12-18 | 2015-05-12 | Ethicon Endo-Surgery, Inc. | Surgical instrument comprising an electrode |
| US9005198B2 (en) | 2010-01-29 | 2015-04-14 | Ethicon Endo-Surgery, Inc. | Surgical instrument comprising an electrode |
| US8469981B2 (en) | 2010-02-11 | 2013-06-25 | Ethicon Endo-Surgery, Inc. | Rotatable cutting implement arrangements for ultrasonic surgical instruments |
| US8951272B2 (en) | 2010-02-11 | 2015-02-10 | Ethicon Endo-Surgery, Inc. | Seal arrangements for ultrasonically powered surgical instruments |
| US8486096B2 (en) | 2010-02-11 | 2013-07-16 | Ethicon Endo-Surgery, Inc. | Dual purpose surgical instrument for cutting and coagulating tissue |
| WO2011111271A1 (en) | 2010-03-11 | 2011-09-15 | オリンパスメディカルシステムズ株式会社 | Forceps suitable for intraperitoneal manipulations and technique of using forceps suitable for intraperitoneal manipulations |
| WO2011127223A1 (en) * | 2010-04-06 | 2011-10-13 | Pavel Menn | Hermetic rotating handle assembly for a surgical clip applier for laparoscopic procedures |
| US8795327B2 (en) | 2010-07-22 | 2014-08-05 | Ethicon Endo-Surgery, Inc. | Electrosurgical instrument with separate closure and cutting members |
| US9192431B2 (en) | 2010-07-23 | 2015-11-24 | Ethicon Endo-Surgery, Inc. | Electrosurgical cutting and sealing instrument |
| US8663270B2 (en) | 2010-07-23 | 2014-03-04 | Conmed Corporation | Jaw movement mechanism and method for a surgical tool |
| CA2915912A1 (en) | 2010-09-10 | 2015-05-07 | Pivot Medical, Inc. | Method and apparatus for passing suture through tissue |
| US10098631B2 (en) | 2010-09-10 | 2018-10-16 | Pivot Medical, Inc. | Method and apparatus for passing suture through tissue |
| WO2012034131A2 (en) | 2010-09-10 | 2012-03-15 | Pivot Medical, Inc. | Method and apparatus for passing suture through tissue |
| US20120078289A1 (en) * | 2010-09-28 | 2012-03-29 | Steve Livneh | Reposable endoscopic forceps system |
| US8523893B2 (en) | 2010-09-30 | 2013-09-03 | Applied Medical Resources Corporation | Laparoscopic scissors |
| ES2664081T3 (en) | 2010-10-01 | 2018-04-18 | Applied Medical Resources Corporation | Electrosurgical system with a radio frequency amplifier and with means for adapting to the separation between electrodes |
| US9113940B2 (en) | 2011-01-14 | 2015-08-25 | Covidien Lp | Trigger lockout and kickback mechanism for surgical instruments |
| US10092291B2 (en) | 2011-01-25 | 2018-10-09 | Ethicon Endo-Surgery, Inc. | Surgical instrument with selectively rigidizable features |
| US8986287B2 (en) | 2011-02-14 | 2015-03-24 | Adrian E. Park | Adjustable laparoscopic instrument handle |
| US9314620B2 (en) | 2011-02-28 | 2016-04-19 | Ethicon Endo-Surgery, Inc. | Electrical ablation devices and methods |
| US9233241B2 (en) | 2011-02-28 | 2016-01-12 | Ethicon Endo-Surgery, Inc. | Electrical ablation devices and methods |
| US9254169B2 (en) | 2011-02-28 | 2016-02-09 | Ethicon Endo-Surgery, Inc. | Electrical ablation devices and methods |
| US9049987B2 (en) | 2011-03-17 | 2015-06-09 | Ethicon Endo-Surgery, Inc. | Hand held surgical device for manipulating an internal magnet assembly within a patient |
| US8974479B2 (en) | 2011-03-30 | 2015-03-10 | Covidien Lp | Ultrasonic surgical instruments |
| US8795241B2 (en) * | 2011-05-13 | 2014-08-05 | Spiration, Inc. | Deployment catheter |
| US9844384B2 (en) | 2011-07-11 | 2017-12-19 | Covidien Lp | Stand alone energy-based tissue clips |
| US9259265B2 (en) | 2011-07-22 | 2016-02-16 | Ethicon Endo-Surgery, Llc | Surgical instruments for tensioning tissue |
| US9028492B2 (en) | 2011-08-18 | 2015-05-12 | Covidien Lp | Surgical instruments with removable components |
| DE102011081464A1 (en) * | 2011-08-24 | 2013-02-28 | Karl Storz Gmbh & Co. Kg | Tool for a micro-invasive-surgical instrument |
| CN103957816A (en) * | 2011-09-13 | 2014-07-30 | 怡得乐工业有限公司 | Single piece biopsy forceps |
| DE102011088003A1 (en) * | 2011-12-08 | 2013-06-13 | Richard Wolf Gmbh | Medical instrument |
| US9636091B2 (en) | 2012-01-13 | 2017-05-02 | Covidien Lp | Hand-held electromechanical surgical system |
| US9241757B2 (en) | 2012-01-13 | 2016-01-26 | Covidien Lp | System and method for performing surgical procedures with a reusable instrument module |
| US8894647B2 (en) | 2012-01-13 | 2014-11-25 | Covidien Lp | System and method for performing surgical procedures with a reusable instrument module |
| EP2811932B1 (en) | 2012-02-10 | 2019-06-26 | Ethicon LLC | Robotically controlled surgical instrument |
| US8986199B2 (en) | 2012-02-17 | 2015-03-24 | Ethicon Endo-Surgery, Inc. | Apparatus and methods for cleaning the lens of an endoscope |
| USD711712S1 (en) | 2012-02-24 | 2014-08-26 | Cercore Llc | Pair of handles for an instrument or tool |
| US9439668B2 (en) | 2012-04-09 | 2016-09-13 | Ethicon Endo-Surgery, Llc | Switch arrangements for ultrasonic surgical instruments |
| US9427255B2 (en) | 2012-05-14 | 2016-08-30 | Ethicon Endo-Surgery, Inc. | Apparatus for introducing a steerable camera assembly into a patient |
| US9113901B2 (en) | 2012-05-14 | 2015-08-25 | Covidien Lp | Modular surgical instrument with contained electrical or mechanical systems |
| US9510891B2 (en) | 2012-06-26 | 2016-12-06 | Covidien Lp | Surgical instruments with structures to provide access for cleaning |
| US20140005705A1 (en) | 2012-06-29 | 2014-01-02 | Ethicon Endo-Surgery, Inc. | Surgical instruments with articulating shafts |
| US9408622B2 (en) | 2012-06-29 | 2016-08-09 | Ethicon Endo-Surgery, Llc | Surgical instruments with articulating shafts |
| US9393037B2 (en) | 2012-06-29 | 2016-07-19 | Ethicon Endo-Surgery, Llc | Surgical instruments with articulating shafts |
| US9351754B2 (en) | 2012-06-29 | 2016-05-31 | Ethicon Endo-Surgery, Llc | Ultrasonic surgical instruments with distally positioned jaw assemblies |
| US9226767B2 (en) | 2012-06-29 | 2016-01-05 | Ethicon Endo-Surgery, Inc. | Closed feedback control for electrosurgical device |
| US9820768B2 (en) | 2012-06-29 | 2017-11-21 | Ethicon Llc | Ultrasonic surgical instruments with control mechanisms |
| US9198714B2 (en) | 2012-06-29 | 2015-12-01 | Ethicon Endo-Surgery, Inc. | Haptic feedback devices for surgical robot |
| US20140005702A1 (en) | 2012-06-29 | 2014-01-02 | Ethicon Endo-Surgery, Inc. | Ultrasonic surgical instruments with distally positioned transducers |
| US9326788B2 (en) | 2012-06-29 | 2016-05-03 | Ethicon Endo-Surgery, Llc | Lockout mechanism for use with robotic electrosurgical device |
| US9078662B2 (en) | 2012-07-03 | 2015-07-14 | Ethicon Endo-Surgery, Inc. | Endoscopic cap electrode and method for using the same |
| US9301798B2 (en) * | 2012-07-19 | 2016-04-05 | Covidien Lp | Surgical forceps including reposable end effector assemblies |
| US9545290B2 (en) | 2012-07-30 | 2017-01-17 | Ethicon Endo-Surgery, Inc. | Needle probe guide |
| US9572623B2 (en) | 2012-08-02 | 2017-02-21 | Ethicon Endo-Surgery, Inc. | Reusable electrode and disposable sheath |
| US10314649B2 (en) | 2012-08-02 | 2019-06-11 | Ethicon Endo-Surgery, Inc. | Flexible expandable electrode and method of intraluminal delivery of pulsed power |
| US9277957B2 (en) | 2012-08-15 | 2016-03-08 | Ethicon Endo-Surgery, Inc. | Electrosurgical devices and methods |
| US9492224B2 (en) | 2012-09-28 | 2016-11-15 | EthiconEndo-Surgery, LLC | Multi-function bi-polar forceps |
| US10842357B2 (en) * | 2012-10-10 | 2020-11-24 | Moskowitz Family Llc | Endoscopic surgical system |
| US9095367B2 (en) | 2012-10-22 | 2015-08-04 | Ethicon Endo-Surgery, Inc. | Flexible harmonic waveguides/blades for surgical instruments |
| US20140135804A1 (en) | 2012-11-15 | 2014-05-15 | Ethicon Endo-Surgery, Inc. | Ultrasonic and electrosurgical devices |
| US10098527B2 (en) | 2013-02-27 | 2018-10-16 | Ethidcon Endo-Surgery, Inc. | System for performing a minimally invasive surgical procedure |
| US9968240B2 (en) | 2013-03-06 | 2018-05-15 | John M. Agee And Karen K. Agee, Trustees Of The John M. Agee Trust | Method and apparatus for treatment of CTS using endoscopic carpal tunnel release |
| US10226273B2 (en) | 2013-03-14 | 2019-03-12 | Ethicon Llc | Mechanical fasteners for use with surgical energy devices |
| US10238411B2 (en) * | 2013-04-20 | 2019-03-26 | Apollo Endosurgery Us, Inc. | Flexible endoscopic torqueable devices |
| JP6416886B2 (en) * | 2013-05-15 | 2018-10-31 | インテュイティブ サージカル オペレーションズ, インコーポレイテッド | Force transmission mechanism for teleoperated surgical system |
| US10966779B2 (en) | 2013-08-07 | 2021-04-06 | Covidien Lp | Bipolar surgical instrument |
| WO2015017991A1 (en) | 2013-08-07 | 2015-02-12 | Covidien Lp | Bipolar surgical instrument |
| US10499975B2 (en) * | 2013-08-07 | 2019-12-10 | Covidien Lp | Bipolar surgical instrument |
| US10751110B2 (en) | 2013-08-07 | 2020-08-25 | Covidien Lp | Bipolar surgical instrument with tissue stop |
| US9814514B2 (en) | 2013-09-13 | 2017-11-14 | Ethicon Llc | Electrosurgical (RF) medical instruments for cutting and coagulating tissue |
| US9265926B2 (en) | 2013-11-08 | 2016-02-23 | Ethicon Endo-Surgery, Llc | Electrosurgical devices |
| GB2521228A (en) | 2013-12-16 | 2015-06-17 | Ethicon Endo Surgery Inc | Medical device |
| GB2521229A (en) | 2013-12-16 | 2015-06-17 | Ethicon Endo Surgery Inc | Medical device |
| US9795436B2 (en) | 2014-01-07 | 2017-10-24 | Ethicon Llc | Harvesting energy from a surgical generator |
| US9554854B2 (en) | 2014-03-18 | 2017-01-31 | Ethicon Endo-Surgery, Llc | Detecting short circuits in electrosurgical medical devices |
| US10092310B2 (en) | 2014-03-27 | 2018-10-09 | Ethicon Llc | Electrosurgical devices |
| US10463421B2 (en) | 2014-03-27 | 2019-11-05 | Ethicon Llc | Two stage trigger, clamp and cut bipolar vessel sealer |
| US9737355B2 (en) | 2014-03-31 | 2017-08-22 | Ethicon Llc | Controlling impedance rise in electrosurgical medical devices |
| US9913680B2 (en) | 2014-04-15 | 2018-03-13 | Ethicon Llc | Software algorithms for electrosurgical instruments |
| WO2015171785A1 (en) * | 2014-05-06 | 2015-11-12 | Agee, John M. And Karen K., Trustees Of The John M. Agee Trust | Method and apparatus for treatment of cts using endoscopic carpal tunnel release |
| US20150324317A1 (en) | 2014-05-07 | 2015-11-12 | Covidien Lp | Authentication and information system for reusable surgical instruments |
| JP6573663B2 (en) | 2014-05-16 | 2019-09-11 | アプライド メディカル リソーシーズ コーポレイション | Electrosurgical system |
| AU2015266619B2 (en) | 2014-05-30 | 2020-02-06 | Applied Medical Resources Corporation | Electrosurgical instrument for fusing and cutting tissue and an electrosurgical generator |
| US10285724B2 (en) | 2014-07-31 | 2019-05-14 | Ethicon Llc | Actuation mechanisms and load adjustment assemblies for surgical instruments |
| US11207127B2 (en) | 2014-09-25 | 2021-12-28 | Covidien Lp | Surgical instruments facilitating replacement of disposable components and/or sterilization of reusable components |
| US10639092B2 (en) | 2014-12-08 | 2020-05-05 | Ethicon Llc | Electrode configurations for surgical instruments |
| EP3236870B1 (en) | 2014-12-23 | 2019-11-06 | Applied Medical Resources Corporation | Bipolar electrosurgical sealer and divider |
| USD748259S1 (en) | 2014-12-29 | 2016-01-26 | Applied Medical Resources Corporation | Electrosurgical instrument |
| US10245095B2 (en) | 2015-02-06 | 2019-04-02 | Ethicon Llc | Electrosurgical instrument with rotation and articulation mechanisms |
| US10342602B2 (en) | 2015-03-17 | 2019-07-09 | Ethicon Llc | Managing tissue treatment |
| US10321950B2 (en) | 2015-03-17 | 2019-06-18 | Ethicon Llc | Managing tissue treatment |
| US10595929B2 (en) | 2015-03-24 | 2020-03-24 | Ethicon Llc | Surgical instruments with firing system overload protection mechanisms |
| US10034684B2 (en) | 2015-06-15 | 2018-07-31 | Ethicon Llc | Apparatus and method for dissecting and coagulating tissue |
| US11020140B2 (en) | 2015-06-17 | 2021-06-01 | Cilag Gmbh International | Ultrasonic surgical blade for use with ultrasonic surgical instruments |
| US11051873B2 (en) | 2015-06-30 | 2021-07-06 | Cilag Gmbh International | Surgical system with user adaptable techniques employing multiple energy modalities based on tissue parameters |
| US10898256B2 (en) | 2015-06-30 | 2021-01-26 | Ethicon Llc | Surgical system with user adaptable techniques based on tissue impedance |
| US10034704B2 (en) | 2015-06-30 | 2018-07-31 | Ethicon Llc | Surgical instrument with user adaptable algorithms |
| US10357303B2 (en) | 2015-06-30 | 2019-07-23 | Ethicon Llc | Translatable outer tube for sealing using shielded lap chole dissector |
| US11141213B2 (en) | 2015-06-30 | 2021-10-12 | Cilag Gmbh International | Surgical instrument with user adaptable techniques |
| US11129669B2 (en) | 2015-06-30 | 2021-09-28 | Cilag Gmbh International | Surgical system with user adaptable techniques based on tissue type |
| US10154852B2 (en) | 2015-07-01 | 2018-12-18 | Ethicon Llc | Ultrasonic surgical blade with improved cutting and coagulation features |
| US10687884B2 (en) | 2015-09-30 | 2020-06-23 | Ethicon Llc | Circuits for supplying isolated direct current (DC) voltage to surgical instruments |
| US10595930B2 (en) | 2015-10-16 | 2020-03-24 | Ethicon Llc | Electrode wiping surgical device |
| US10213250B2 (en) | 2015-11-05 | 2019-02-26 | Covidien Lp | Deployment and safety mechanisms for surgical instruments |
| US10952726B2 (en) | 2015-12-10 | 2021-03-23 | Covidien Lp | Handheld electromechanical surgical instruments |
| US10179022B2 (en) | 2015-12-30 | 2019-01-15 | Ethicon Llc | Jaw position impedance limiter for electrosurgical instrument |
| US10575892B2 (en) | 2015-12-31 | 2020-03-03 | Ethicon Llc | Adapter for electrical surgical instruments |
| US10709469B2 (en) | 2016-01-15 | 2020-07-14 | Ethicon Llc | Modular battery powered handheld surgical instrument with energy conservation techniques |
| US11229471B2 (en) | 2016-01-15 | 2022-01-25 | Cilag Gmbh International | Modular battery powered handheld surgical instrument with selective application of energy based on tissue characterization |
| US10716615B2 (en) | 2016-01-15 | 2020-07-21 | Ethicon Llc | Modular battery powered handheld surgical instrument with curved end effectors having asymmetric engagement between jaw and blade |
| US11129670B2 (en) | 2016-01-15 | 2021-09-28 | Cilag Gmbh International | Modular battery powered handheld surgical instrument with selective application of energy based on button displacement, intensity, or local tissue characterization |
| US10426543B2 (en) | 2016-01-23 | 2019-10-01 | Covidien Lp | Knife trigger for vessel sealer |
| US10555769B2 (en) | 2016-02-22 | 2020-02-11 | Ethicon Llc | Flexible circuits for electrosurgical instrument |
| US10646269B2 (en) | 2016-04-29 | 2020-05-12 | Ethicon Llc | Non-linear jaw gap for electrosurgical instruments |
| US10485607B2 (en) | 2016-04-29 | 2019-11-26 | Ethicon Llc | Jaw structure with distal closure for electrosurgical instruments |
| US10702329B2 (en) | 2016-04-29 | 2020-07-07 | Ethicon Llc | Jaw structure with distal post for electrosurgical instruments |
| US10456193B2 (en) | 2016-05-03 | 2019-10-29 | Ethicon Llc | Medical device with a bilateral jaw configuration for nerve stimulation |
| US10245064B2 (en) | 2016-07-12 | 2019-04-02 | Ethicon Llc | Ultrasonic surgical instrument with piezoelectric central lumen transducer |
| US10893883B2 (en) | 2016-07-13 | 2021-01-19 | Ethicon Llc | Ultrasonic assembly for use with ultrasonic surgical instruments |
| US10842522B2 (en) | 2016-07-15 | 2020-11-24 | Ethicon Llc | Ultrasonic surgical instruments having offset blades |
| US10376305B2 (en) | 2016-08-05 | 2019-08-13 | Ethicon Llc | Methods and systems for advanced harmonic energy |
| US10285723B2 (en) | 2016-08-09 | 2019-05-14 | Ethicon Llc | Ultrasonic surgical blade with improved heel portion |
| US10631887B2 (en) | 2016-08-15 | 2020-04-28 | Covidien Lp | Electrosurgical forceps for video assisted thoracoscopic surgery and other surgical procedures |
| USD847990S1 (en) | 2016-08-16 | 2019-05-07 | Ethicon Llc | Surgical instrument |
| US10779847B2 (en) | 2016-08-25 | 2020-09-22 | Ethicon Llc | Ultrasonic transducer to waveguide joining |
| US10952759B2 (en) | 2016-08-25 | 2021-03-23 | Ethicon Llc | Tissue loading of a surgical instrument |
| US10603064B2 (en) | 2016-11-28 | 2020-03-31 | Ethicon Llc | Ultrasonic transducer |
| US11266430B2 (en) | 2016-11-29 | 2022-03-08 | Cilag Gmbh International | End effector control and calibration |
| US11172980B2 (en) | 2017-05-12 | 2021-11-16 | Covidien Lp | Electrosurgical forceps for grasping, treating, and/or dividing tissue |
| US10973567B2 (en) | 2017-05-12 | 2021-04-13 | Covidien Lp | Electrosurgical forceps for grasping, treating, and/or dividing tissue |
| USD854684S1 (en) | 2017-06-08 | 2019-07-23 | Covidien Lp | Open vessel sealer with mechanical cutter |
| US10653475B2 (en) | 2017-06-08 | 2020-05-19 | Covidien Lp | Knife lockout for electrosurgical forceps |
| USD854149S1 (en) | 2017-06-08 | 2019-07-16 | Covidien Lp | End effector for open vessel sealer |
| US10820920B2 (en) | 2017-07-05 | 2020-11-03 | Ethicon Llc | Reusable ultrasonic medical devices and methods of their use |
| GB2565573A (en) * | 2017-08-17 | 2019-02-20 | Creo Medical Ltd | Interface joint for an electrosurgical apparatus |
| US10945808B2 (en) * | 2018-04-23 | 2021-03-16 | Covidien Lp | Cleaning systems for reprocessing surgical instruments |
| EP3578118B1 (en) * | 2018-06-05 | 2022-08-31 | Erbe Elektromedizin GmbH | Surgical instrument |
| CA3111558A1 (en) | 2018-09-05 | 2020-03-12 | Applied Medical Resources Corporation | Electrosurgical generator control system |
| US11471211B2 (en) | 2018-10-12 | 2022-10-18 | Covidien Lp | Electrosurgical forceps |
| US11376062B2 (en) | 2018-10-12 | 2022-07-05 | Covidien Lp | Electrosurgical forceps |
| US11696796B2 (en) | 2018-11-16 | 2023-07-11 | Applied Medical Resources Corporation | Electrosurgical system |
| US11350982B2 (en) | 2018-12-05 | 2022-06-07 | Covidien Lp | Electrosurgical forceps |
| US11523861B2 (en) | 2019-03-22 | 2022-12-13 | Covidien Lp | Methods for manufacturing a jaw assembly for an electrosurgical forceps |
| US20230056943A1 (en) * | 2019-12-13 | 2023-02-23 | Dinesh Vyas | Stapler apparatus and methods for use |
| US11812957B2 (en) | 2019-12-30 | 2023-11-14 | Cilag Gmbh International | Surgical instrument comprising a signal interference resolution system |
| US11452525B2 (en) | 2019-12-30 | 2022-09-27 | Cilag Gmbh International | Surgical instrument comprising an adjustment system |
| US11660089B2 (en) | 2019-12-30 | 2023-05-30 | Cilag Gmbh International | Surgical instrument comprising a sensing system |
| US11684412B2 (en) | 2019-12-30 | 2023-06-27 | Cilag Gmbh International | Surgical instrument with rotatable and articulatable surgical end effector |
| US11779329B2 (en) | 2019-12-30 | 2023-10-10 | Cilag Gmbh International | Surgical instrument comprising a flex circuit including a sensor system |
| US11744636B2 (en) | 2019-12-30 | 2023-09-05 | Cilag Gmbh International | Electrosurgical systems with integrated and external power sources |
| US20210196344A1 (en) | 2019-12-30 | 2021-07-01 | Ethicon Llc | Surgical system communication pathways |
| US11944366B2 (en) | 2019-12-30 | 2024-04-02 | Cilag Gmbh International | Asymmetric segmented ultrasonic support pad for cooperative engagement with a movable RF electrode |
| US11779387B2 (en) | 2019-12-30 | 2023-10-10 | Cilag Gmbh International | Clamp arm jaw to minimize tissue sticking and improve tissue control |
| US11911063B2 (en) | 2019-12-30 | 2024-02-27 | Cilag Gmbh International | Techniques for detecting ultrasonic blade to electrode contact and reducing power to ultrasonic blade |
| US11589916B2 (en) | 2019-12-30 | 2023-02-28 | Cilag Gmbh International | Electrosurgical instruments with electrodes having variable energy densities |
| US11937866B2 (en) | 2019-12-30 | 2024-03-26 | Cilag Gmbh International | Method for an electrosurgical procedure |
| US11786291B2 (en) | 2019-12-30 | 2023-10-17 | Cilag Gmbh International | Deflectable support of RF energy electrode with respect to opposing ultrasonic blade |
| US11696776B2 (en) | 2019-12-30 | 2023-07-11 | Cilag Gmbh International | Articulatable surgical instrument |
| US11937863B2 (en) | 2019-12-30 | 2024-03-26 | Cilag Gmbh International | Deflectable electrode with variable compression bias along the length of the deflectable electrode |
| US11622804B2 (en) | 2020-03-16 | 2023-04-11 | Covidien Lp | Forceps with linear trigger mechanism |
| US11844562B2 (en) | 2020-03-23 | 2023-12-19 | Covidien Lp | Electrosurgical forceps for grasping, treating, and/or dividing tissue |
Citations (3)
| Publication number | Priority date | Publication date | Assignee | Title |
|---|---|---|---|---|
| US4522206A (en) * | 1983-01-26 | 1985-06-11 | Dyonics, Inc. | Surgical instrument |
| EP0308258A2 (en) * | 1987-09-18 | 1989-03-22 | Agee, John M., Dr. | Surgical instrument |
| WO1991002493A1 (en) * | 1989-08-16 | 1991-03-07 | Raychem Corporation | A device for grasping or cutting an object |
Family Cites Families (21)
| Publication number | Priority date | Publication date | Assignee | Title |
|---|---|---|---|---|
| US1275107A (en) * | 1918-08-06 | Leslie E Vass | Hair-clipper. | |
| US514273A (en) * | 1894-02-06 | Animal-shears | ||
| US2034785A (en) * | 1935-07-12 | 1936-03-24 | Wappler Frederick Charles | Endoscopic forceps |
| US2113246A (en) * | 1937-05-17 | 1938-04-05 | Wappler Frederick Charles | Endoscopic forceps |
| US2518994A (en) * | 1946-08-21 | 1950-08-15 | William J Miller | Forceps |
| DE3303335A1 (en) * | 1983-02-02 | 1984-08-02 | Reinhold 7230 Schramberg Straub | MICRO-SURGICAL INSTRUMENT |
| DE8316034U1 (en) * | 1983-06-01 | 1983-09-29 | Richard Wolf Gmbh, 7134 Knittlingen | Scissor handle for exchangeable pliers bits |
| EP0165472B1 (en) * | 1984-05-18 | 1991-02-06 | Harald Maslanka | Surgical gripping instrument |
| DE8702446U1 (en) * | 1987-02-18 | 1987-10-08 | Kothe, Lutz, 7760 Radolfzell, De | |
| US4962770A (en) * | 1987-09-18 | 1990-10-16 | John M. Agee | Surgical method |
| EP0380874A1 (en) * | 1989-01-31 | 1990-08-08 | C.R. Bard, Inc. | Disposable biopsy forceps |
| US5052402A (en) * | 1989-01-31 | 1991-10-01 | C.R. Bard, Inc. | Disposable biopsy forceps |
| US5009661A (en) * | 1989-04-24 | 1991-04-23 | Michelson Gary K | Protective mechanism for surgical rongeurs |
| US5133736A (en) * | 1990-05-10 | 1992-07-28 | Symbiosis Corporation | Investment cast end effectors for disposable laparoscopic surgical instrument |
| US5152780A (en) * | 1990-05-31 | 1992-10-06 | Tnco, Inc. | Micro-instrument |
| US5209747A (en) * | 1990-12-13 | 1993-05-11 | Knoepfler Dennis J | Adjustable angle medical forceps |
| US5174300A (en) * | 1991-04-04 | 1992-12-29 | Symbiosis Corporation | Endoscopic surgical instruments having rotatable end effectors |
| US5478351A (en) * | 1992-06-24 | 1995-12-26 | Microsurge, Inc. | Endoscopic surgical tool with handle and detachable tool assembly |
| ES2115068T3 (en) * | 1992-06-24 | 1998-06-16 | Microsurge Inc | REUSABLE ENDOSCOPIC SURGICAL INSTRUMENT. |
| US5290308A (en) * | 1992-07-15 | 1994-03-01 | Edward Weck Incorporated | Endoscopic instrument |
| US5258006A (en) * | 1992-08-21 | 1993-11-02 | Everest Medical Corporation | Bipolar electrosurgical forceps |
-
1993
- 1993-06-23 ES ES93916724T patent/ES2115068T3/en not_active Expired - Lifetime
- 1993-06-23 JP JP50256494A patent/JP3518603B2/en not_active Expired - Lifetime
- 1993-06-23 EP EP93916724A patent/EP0647122B1/en not_active Expired - Lifetime
- 1993-06-23 AU AU46486/93A patent/AU4648693A/en not_active Abandoned
- 1993-06-23 WO PCT/US1993/006024 patent/WO1994000059A1/en active IP Right Grant
- 1993-06-23 DE DE69316894T patent/DE69316894T2/en not_active Expired - Lifetime
-
1995
- 1995-03-01 US US08/396,890 patent/US5499992A/en not_active Expired - Lifetime
-
1997
- 1997-11-20 US US08/974,827 patent/US5928255A/en not_active Expired - Lifetime
-
2003
- 2003-07-07 JP JP2003192850A patent/JP4069027B2/en not_active Expired - Lifetime
Patent Citations (3)
| Publication number | Priority date | Publication date | Assignee | Title |
|---|---|---|---|---|
| US4522206A (en) * | 1983-01-26 | 1985-06-11 | Dyonics, Inc. | Surgical instrument |
| EP0308258A2 (en) * | 1987-09-18 | 1989-03-22 | Agee, John M., Dr. | Surgical instrument |
| WO1991002493A1 (en) * | 1989-08-16 | 1991-03-07 | Raychem Corporation | A device for grasping or cutting an object |
Also Published As
| Publication number | Publication date |
|---|---|
| JP2004000667A (en) | 2004-01-08 |
| US5928255A (en) | 1999-07-27 |
| DE69316894T2 (en) | 1998-09-24 |
| WO1994000059A1 (en) | 1994-01-06 |
| AU4648693A (en) | 1994-01-24 |
| JPH07508201A (en) | 1995-09-14 |
| JP3518603B2 (en) | 2004-04-12 |
| JP4069027B2 (en) | 2008-03-26 |
| ES2115068T3 (en) | 1998-06-16 |
| EP0647122A1 (en) | 1995-04-12 |
| DE69316894D1 (en) | 1998-03-12 |
| US5499992A (en) | 1996-03-19 |
Similar Documents
| Publication | Publication Date | Title |
|---|---|---|
| EP0647122B1 (en) | Reusable endoscopic surgical instrument | |
| US5746759A (en) | Reusable endoscopic surgical instrument | |
| US5499998A (en) | Endoscoptic surgical instrument with guided jaws and ratchet control | |
| CA2090980C (en) | Ligating clip applier | |
| US5984938A (en) | Surgical instrument with jaws and movable internal scissors and method for use thereof | |
| US5665100A (en) | Multifunctional instrument with interchangeable operating units for performing endoscopic procedures | |
| US5282806A (en) | Endoscopic surgical instrument having a removable, rotatable, end effector assembly | |
| EP0793944B1 (en) | Apparatus for applying surgical clips | |
| US4674500A (en) | Sheathed knife instrument | |
| US5281235A (en) | Needle manipulator | |
| EP0736285B1 (en) | Surgical cutting apparatus | |
| EP0603472B1 (en) | Self contained gas powered surgical apparatus | |
| US5922001A (en) | Surgical instrument with jaws and a movable internal blade member and method for use thereof | |
| US5275614A (en) | Axially extendable endoscopic surgical instrument | |
| US5893874A (en) | Surgical instrument | |
| US5755713A (en) | Laparoscopic instrument assembly including a plurality of instruments | |
| EP0648476A1 (en) | Self contained gas powered surgical apparatus | |
| CA2678278A1 (en) | Laparoscopic instrument and related surgical method | |
| JP2008093434A (en) | Surgical instrument with articulating tool assembly | |
| WO1993016644A1 (en) | Endoscopic surgical instrument with rotary end-effect element | |
| JP2003525650A (en) | Surgical instrument having rotatably mounted offset end effector and method of use thereof | |
| JPH02297331A (en) | Hard endoscope device | |
| AU2014256370B2 (en) | Surgical stapling device | |
| WO1999055217A9 (en) | Multiple needle suturing instrument and method |
Legal Events
| Date | Code | Title | Description |
|---|---|---|---|
| PUAI | Public reference made under article 153(3) epc to a published international application that has entered the european phase |
Free format text: ORIGINAL CODE: 0009012 |
|
| 17P | Request for examination filed |
Effective date: 19941224 |
|
| AK | Designated contracting states |
Kind code of ref document: A1 Designated state(s): DE ES FR GB IE IT |
|
| 17Q | First examination report despatched |
Effective date: 19960429 |
|
| GRAG | Despatch of communication of intention to grant |
Free format text: ORIGINAL CODE: EPIDOS AGRA |
|
| GRAG | Despatch of communication of intention to grant |
Free format text: ORIGINAL CODE: EPIDOS AGRA |
|
| GRAH | Despatch of communication of intention to grant a patent |
Free format text: ORIGINAL CODE: EPIDOS IGRA |
|
| GRAH | Despatch of communication of intention to grant a patent |
Free format text: ORIGINAL CODE: EPIDOS IGRA |
|
| GRAA | (expected) grant |
Free format text: ORIGINAL CODE: 0009210 |
|
| AK | Designated contracting states |
Kind code of ref document: B1 Designated state(s): DE ES FR GB IE IT |
|
| REF | Corresponds to: |
Ref document number: 69316894 Country of ref document: DE Date of ref document: 19980312 |
|
| ITF | It: translation for a ep patent filed |
Owner name: JACOBACCI & PERANI S.P.A. |
|
| ET | Fr: translation filed | ||
| REG | Reference to a national code |
Ref country code: ES Ref legal event code: FG2A Ref document number: 2115068 Country of ref document: ES Kind code of ref document: T3 |
|
| REG | Reference to a national code |
Ref country code: IE Ref legal event code: FG4D Free format text: 78766 |
|
| PLBE | No opposition filed within time limit |
Free format text: ORIGINAL CODE: 0009261 |
|
| STAA | Information on the status of an ep patent application or granted ep patent |
Free format text: STATUS: NO OPPOSITION FILED WITHIN TIME LIMIT |
|
| 26N | No opposition filed | ||
| REG | Reference to a national code |
Ref country code: GB Ref legal event code: IF02 |
|
| PGFP | Annual fee paid to national office [announced via postgrant information from national office to epo] |
Ref country code: IE Payment date: 20090423 Year of fee payment: 17 Ref country code: ES Payment date: 20090623 Year of fee payment: 17 |
|
| PGFP | Annual fee paid to national office [announced via postgrant information from national office to epo] |
Ref country code: IT Payment date: 20090620 Year of fee payment: 17 Ref country code: FR Payment date: 20090605 Year of fee payment: 17 |
|
| PGFP | Annual fee paid to national office [announced via postgrant information from national office to epo] |
Ref country code: GB Payment date: 20100401 Year of fee payment: 18 Ref country code: DE Payment date: 20100630 Year of fee payment: 18 |
|
| REG | Reference to a national code |
Ref country code: FR Ref legal event code: ST Effective date: 20110228 |
|
| REG | Reference to a national code |
Ref country code: IE Ref legal event code: MM4A |
|
| PG25 | Lapsed in a contracting state [announced via postgrant information from national office to epo] |
Ref country code: IT Free format text: LAPSE BECAUSE OF NON-PAYMENT OF DUE FEES Effective date: 20100623 |
|
| PG25 | Lapsed in a contracting state [announced via postgrant information from national office to epo] |
Ref country code: IE Free format text: LAPSE BECAUSE OF NON-PAYMENT OF DUE FEES Effective date: 20100623 |
|
| PG25 | Lapsed in a contracting state [announced via postgrant information from national office to epo] |
Ref country code: FR Free format text: LAPSE BECAUSE OF NON-PAYMENT OF DUE FEES Effective date: 20100630 |
|
| REG | Reference to a national code |
Ref country code: ES Ref legal event code: FD2A Effective date: 20110715 |
|
| PG25 | Lapsed in a contracting state [announced via postgrant information from national office to epo] |
Ref country code: ES Free format text: LAPSE BECAUSE OF NON-PAYMENT OF DUE FEES Effective date: 20110705 |
|
| PG25 | Lapsed in a contracting state [announced via postgrant information from national office to epo] |
Ref country code: ES Free format text: LAPSE BECAUSE OF NON-PAYMENT OF DUE FEES Effective date: 20100624 |
|
| GBPC | Gb: european patent ceased through non-payment of renewal fee |
Effective date: 20110623 |
|
| REG | Reference to a national code |
Ref country code: DE Ref legal event code: R119 Ref document number: 69316894 Country of ref document: DE Effective date: 20120103 |
|
| PG25 | Lapsed in a contracting state [announced via postgrant information from national office to epo] |
Ref country code: DE Free format text: LAPSE BECAUSE OF NON-PAYMENT OF DUE FEES Effective date: 20120103 |
|
| PG25 | Lapsed in a contracting state [announced via postgrant information from national office to epo] |
Ref country code: GB Free format text: LAPSE BECAUSE OF NON-PAYMENT OF DUE FEES Effective date: 20110623 |